Homemade ice cream and meringue blueberry pots….Part 2….. Cooking for Jacques and testing recipes for Christmas Lunch

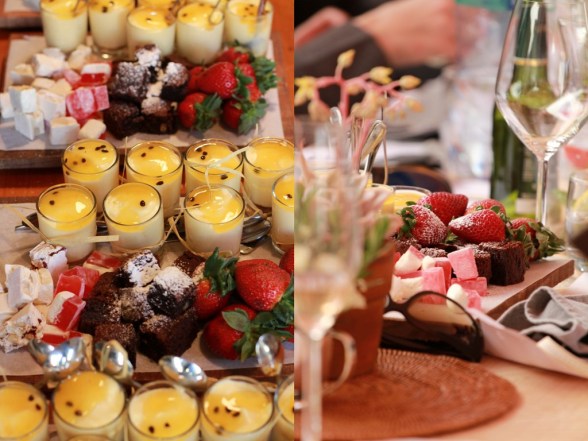
I could not wait to try out this new idea, originated from the Zest kitchen at Beaumont Wines, I love jars, any kind of jar and to serve food for a picnic or dessert like this is visually appealing to me.

The pots have layers of ice cream, broken up meringues (see part one), and a berry coulis, this is my “attempt” to re-create the Zest Jars… o and if you EVER need a great catering team, they are THE BEST!

For the little ice cream jars you will need:
Ice cream
410g evaporated milk, this must be very cold
250ml castor sugar
250ml double thick cream (I used normal whipping cream)
5ml vanilla essence (I used vanilla extract or a pod, just love the little black seeds)

Blueberry coulis
3 cups fresh or frozen blueberries
1.5 cups water
200 ml castor sugar
30 – 50ml of fresh lemon juice (to taste)
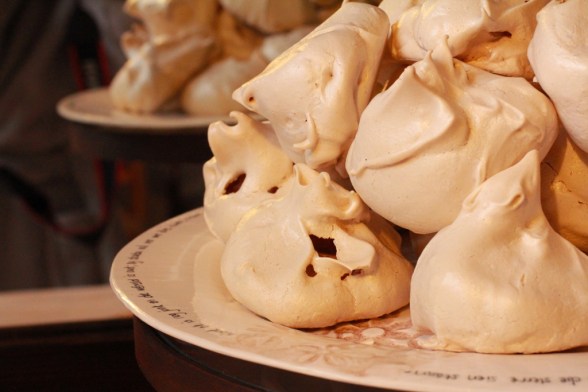
Gooey meringues
See part 1 for the gooooey meringue recipe, you can buy the meringues but please don’t get the white powdery ones, make sure it is a good quality meringue.

AND little jars for serving…

No 2. homemade icecream and mreinge post

For the ice cream, (recipe found it in one of our Local Magazines….) whip the evaporated milk, I prefer to use my Kenwood for this, you need a powerfull mixer to beat the evaporated milk into a cloud. Once thick add the castor sugar spoon by spoon, make sure you mix well after each spoonful, whip the cream seperately and fold into the whipped evaporated milk and sugar. Finally add the vanilla extract… and fold through. Pour into a chilled plastic container and freeze immediately, no need to stir this icecream like some recipes suggest, it is perfect….

Local grown blueberries from Lorraine Farm

Local grown blueberries from Lorraine Farm

Now for the berry coulis, boil together 3 cups of blueberries with 1.5 cups of water, for +/- 7 minutes. Use a potato masher and mash the cooked watery blueberries, this will crush open the soft blueberries and release the insides. Then strain them over a sieve to get rid of the skins, I use the back of a spoon to press the skins and force every little bit of liquid through the sieve. Now boil the strained runny blueberry liquid with 200ml of castor sugar for about 10 minutes until slightly reduced. Add the lemon juice and taste, add more if not sour enough, you want it sour as that is what works like magic with the sweet meringues and ice cream.

You need to give the icecream about 5 hours to freeze and the blueberry coulis needs to be cold…. THEN we pack the jars….

The process of packing the jars...

The process of packing the jars…

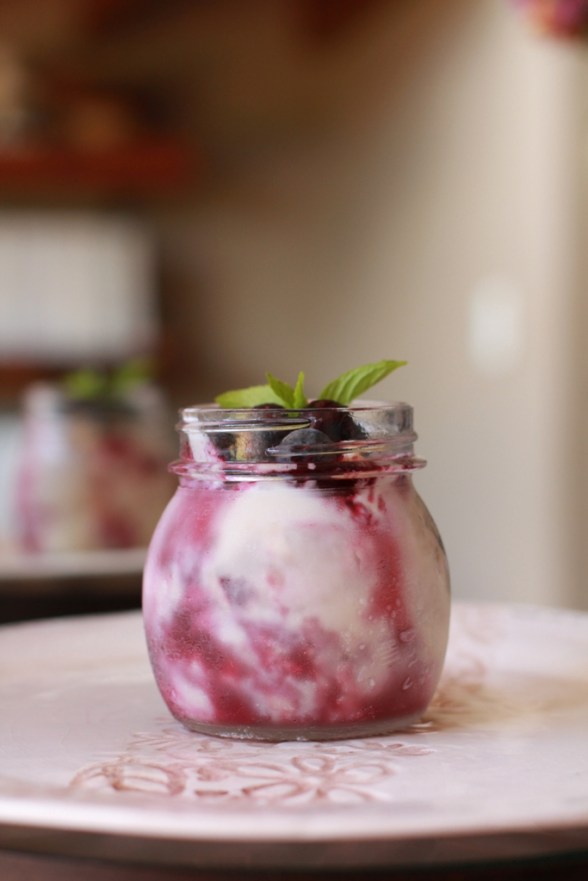
Pack layers of flat crushed gooooey meringue, layers of ice cream and the blueberry coulis, and another layer of flat crushed gooooey meringe , ice cream and blueberry coulis….. and freeze, I did not put the lids on the jars as I was worried that the lids will rust… and what is great, you can make everything up to this point a day in advance, even two if you want. I’ve kept one jar out for Mr Huxter, my blueberry grower and ice cream fanatic, and only managed to get it to him 4 days later, and need I say that there was a little bit of a fight over who’s spoon goes in first between him and Issie…

My good friend, suggested we add some mint to add colour to my pics...

My good friend, suggested we add some mint to add colour to my pics…

At dessert time, all you need to do is remove the jars from the freezer and serve, add frozen or fresh whole blueberries on top and mint for pretty pics as Shannon said.

Someone could not wait for their jars...

Someone could not wait for their jars…

These jars seems to be a bit of an effort, and to be honest they are, but really easy and so worth it…

The secret is in the quality of the meringues and icecream, you can go the quick way but believe me the taste of the homemade version is just soooooo worth it.

No 7. homemade icecream pots

Jacques, next time I will serve the ice cream jars as the “starter” then you can take your time enjoying them as there won’t be any need to rush to catch that plane back to Johannesburg…

No 8. homemade icecream pots

What a wonderful idea, thanks to the Zest girls….

Printable PDF recipe card, click on the link below…
8. Ice cream, blueberry and meringue jarsRECIPE CARD

Gooey meringues… Part 1…… Cooking for Jacques and testing recipes for Christmas Lunch…

I’ve tried and tested this recipe several times before I got the timing right, yes the goooooeyness is all in the baking time…..

We invited Jacques, a brother of a GOOD FRIEND, for lunch, and what better time to try out those frozen homemade icecream and meringue pots I’ve ordered from the Zest Kitchen at The Beaumont Wines’s open gardens day in early November…. I don’t have the recipe but will give it a go….

It start with baking gooooey meringes

For the Gooooey meringes you will need:

8 egg whites at room temperature
240 g castor sugar
240 g sifted icing sugar
5ml of cacao powder
2.5ml vanilla paste or half scraped out vanilla pod

Seperate the eggs and beat the egg whites until soft peaks. Mix together the castor sugar, icing sugar and cacao and spoon tablespoons full of the sugary dry mixture into the egg whites while continiously mixing, I use my Kenwood on a high speed, but you can use any “freestanding” electric mixer.

By slowly adding the dry ingredients while continiously mixing, the egg whites will turn into a shiney stiff sugary cloud…. mix in the vanilla…

Preheat the oven to 120 degrees.

Spoon egg size dollops of meringue onto a baking tray, I prefer not to use baking paper for these. Use two tablespoons, and scrape the egg size dollop out of the other spoon onto the try, make a twirly point at the top of the meringe by circling the meringe with one of the spoons.

The meringues will double in size, so make sure you leave enough space so they don’t “climb on top of each other”.

Bake for 1 hour 15 minutes at 120 degrees. Do not open the oven door, leave to cool for 2 hours before taking them out.

After 2 hours, remove the meringues from the oven and store in an airtight container.

Click on the recipe card in PDF for a printable recipe card.
Gooooey Meringues RECIPE CARD

And this is what these meringues turned into, recipe to follow later…

Gooey meringe, homemade icecream and blueberry coulis pots…

Flapjacks and the Rhino art with a heart platter….

On Friday evening we’ve had the Applewood Preparatory School’s auction in aid of “CONSERVING THE RHINO’S of OUR BEAUTIFUL COUNTRY”. The School Art auctions are usually a bit of a “support and buy your own child’s art” fundraiser, but this year, the Rhino Art was really amasing thanks to a very dedicated Art Teacher, Tina Beaumont.

Emma’s class made beautiful platters and I just knew that I had to get my hand’s on one of them, as mmmm yes, I could see the yellow golden flapjacks displayed on it for Saturday morning’s breakfast…..

For the soft warm and golden flapjacks you will need:
2 eggs
250 ml milk
125 ml sugar
500ml or 2 cups of cake flour
4 teaspoons baking powder
pinch of salt
2 tablespoons butter
oil for frying
Blueberries, honey, or grated cheddar cheese

Mix the eggs and sugar, then add the milk and butter and mix well. Add the sifted flour, baking powder and salt, at this point don’t overmix, just mix until combined.

Add +/- 4 tablespoons of oil to the pan and fry tablespoons full of batter to form perfect flapjacks. Once in the pan I like to add 3 x frozen blueberries on top of each flapjack, better to keep the blueberries frozen, then they don’t go too soggy while frying. The pan needs to be warm but I like to fry them over a medium heat, it takes a bit longer but they need to be cooked inside and still light brown….

Click on the “recipe card” below for a printable PDF short recipe card.
Flapjacks RECIPE CARD

Serve warm with syrup, honey, cheese or just plain….

Keep any leftover batter in the fridge, cover with clingwrap, and on Sunday morning give it a good mix, add a little bit of milk to loosen the batter and let the smell of sweet flapjacks wake your family to a beautiful morning like right now….

Art in aid of “Rhino art with a heart…” by Abby Green

Thanks again to Tina Beaumont for organising this wonderful and very successful Rhino fundraising event…

Orange cake ……. (light, easy, moist and delicious!)

This light summer orange cake is ideal for lazy Christmas holiday afternoons. I love making this cake as a gift when we get invited to a summer lunch…. Even if your host serve dessert, this light cake will go down well with late afternoon coffee…

For the Orange Cake you will need:

1 cup sugar
1 cup soft butter
3 eggs
1 cup sour cream
1 + 3/4 cup cake flour
1 teaspoon bicarb of soda
1 teaspoon baking powder
rind of 2 oranges

Cream together the sugar and butter until light and fluffy. Add the eggs, sourcream and orange rind. Mix well. Add the sifted flour, bicarb of soda and baking powder and combine with butter / sugar mixture. Bake in a greased square tin for about 45 minutes.

While the cake is baking prepare the orange syrup:
Simmer together for about 5 minutes, the juice of 2 oranges, juice of 1 lemon, 3/4 cup of sugar and a pinch of salt.

Let the warm cake rest for 15 minutes, turn the cake out of the tin onto a pretty flat serving platter. Pour the warm syrup over the cake.

Serve with fresh berries and a dusting of icing sugar… and a dollop of cream, but not really necessary…

Light, orangy, plain and simple afternoon tea cake….

Click on the recipe card link for a printable PDF recipe card
Orange cake RECIPE CARD

Or serve this lovely orange cake as a light Christmas eve dessert, beautifull and full of Christmas colours and flavours….

Christmas tree biscuits and burger lollies……

I love Christmas, and what better way to start the Christmas spirit by baking these beautiful Christmas tree biscuits with the kids…. I think Emma will bake and ice biscuits every day till Christmas if I allow her to.

This was the second year that we’ve iced Christmas Tree biscuits, and I think it will become an annual event for the first weekend in November, I am not sure who was the most excited about this years “icing”, me or Emma, she wanted to invite her whole class from school.

Bake basic sweet sugar biscuits from your favourite recipe or use the following recipe:
250g butter
1 cup castor sugar
2 eggs
2.5ml vanilla
2 cups flour
salt

Cream the butter and sugar, add the eggs and vanilla, and mix well.
Add the sifted flour and salt. Mix and cover with cling wrap. Rest for 1 hour in a cool area.

Dust the table and rolling pin with flour and roll the dough until +/- 4mm thick. Cut the shapes with pretty Christmas cutters.
Bake in a preheated oven for 15 minutes on baking paper. Remove from oven, the biscuits will still feel soft to the touch, let it cool.

The Rust and De Villiers families joined us this year, thanks to Caroline for baking “extra” biscuits as you can never have enough….

I lined the table with baking paper, and added little bowls of “anything I could find in my cupboard” for decoration, including edible glitter which will sparkle on the Christmas Tree.

Gifts from my guests…

Yummy messssss

Everyone got into it, even the adults…

Ari licked till right at the end, I think if I send the roll of waxed paper home with her she would have licked it clean by the next morning….

I love these lollipop burgers, ideal “make ahead” to braai quickly after the biscuit icing marathon….. Thanks to Magriet Cherry for this clever idea, originally served with pita breads…

Lollipop burgers…

It does not matter HOW busy I am, there will always be dessert….. I think I am in love with this flat lemon cheesecake from Donna Hay….. and make it whenever I can

I am sure the kids will dream tonight of Christmas and biscuits sparkling full of glitter on the Christmas tree.

Sweet dreams little Emma…

Now the BIG job start of packing out and decorating this year’s Christmas Tree….

Summer concert snacks….

It’s time again……. for The Paul Cluver Amphitheatre summer concerts.

Let me keep this one short, skewer firm blueberries, raspberries, yummy chocolate brownies and end with cubes of nougat…. serve with bubbly, sit back and let the concert under the stars begins…

Prime Circle… here again in +/- 4 weeks time…

Summer evenings cannot get better than this…. don’t miss Prime Circle & Dan Patlansky ….. 8 December 2012

Snack style dessert and cheese boards with Lemon Mousse ….. Let’s cook for 50 at a good friend’s 50th… Part 9 of 9

Shannon decided to serve small size sweet and cheese boards, one of each per 10 guests, snacky style…..

We’ve decided to add the shot glasses filled with lemon mousse for “visual effects…”, it needs to look good and one of our “mood boards” had a picture of these little shot glasses filled with chocolate mousse, with small spoons tied onto each glass with a ribbon. We changed the chocolate mousse to lemon mousse and let me tell you that the tying of the spoons to the little glasses neeeeeeeearly let me loose my cool, so if you like this idea, just put the spoon in the glas…..

What is easy about this dessert is that everything can be done before the time and you can ask one of your “creative” friends to pack the boards while you mingle with the guests, choose your friend well as this is all about “how it looks”…..

Our Boards consisted out of the following:

Sweet Boards
Lemon mousse shotglasses
Small chocolate brownie blocks
Strawberries
Turkish delight
Nougat

Shannon made the Lemon Mousse the evening before our lunch, as you need enough time to let it “set” properly…

For the Lemon Mousse you will need:
finely grated rind of 4 lemons and the juice of 3 lemons
8 large freerange eggs
250g castor sugar
1.5 (20gms) sachets powdered gelatine
450ml cream
1 small tin granadilla pulp
1 pkt Nuttikrust caramelised Oat biscuits – for the base

Whisk the egg yolks and gradually add the sugar, whisk till pale in colour and thick. Heat the lemon rind and lemon juice in a saucepan and add the gelatine. Over a slow heat stir and melt the gelatine into the lemon juice, bring the lemon juice to just before boiling point to make sure the gelatine dissolve completely.

While whisking, slowly pour the lemon juice into the sugar and egg mixture, whisk well. Let the mixture cool completely at room temperature. Fold the whipped cream into the eggy mixture. Whisk the egg whites until very stiff and fold into the eggy and cream mixture.

Liquidise the nuttikrust biscuits finely, and add about 1 teaspoon to the bottom of each shot glass. Spoon the mousse into the small shot glasses,…. be patient…. . Refrigerate over night. Just before serving add one teaspoon of granadilla pulp on top of the mousse.

We’ve used square wooden boards, +/- 30 x 25 cm’s wide. Pack with rows of lemon mousse shot glasses, and small heaps of strawberries, brownies, turkish delight and nougat. Dust with icing sugar …

So how excited can I get, seeing that our idea “worked” , VERY EXCITED when you look at it and just know that these sweet and cheese boards is going to blow Shannon away when I serve these to her and her guests at the lunch table (as per my previous posts, I told Shannon to go and sit down with her guests, heee haaaaa and took over her kitchen)……

Click on the link below for a printable PDF short recipe:
Lemon mousse RECIPE CARD

For the cheese boards we’ve used:
Purple figs cut in 4
Grapes
Brie
Camembert
Creamy Gorgonzola
2 x types biscuits (we love digestive biscuits)
Cheddar blocks
and almonds

This is where all the planning stopped, right here…..

BUT I had a little surprise up my sleave for Shannon……

I’ve planned a small coffee table, we did not plan to serve coffee but looking at the weather report I realised that it is going to be a very cool 15 degrees and realised that some of the guests might like to end their lunch with a late afternoon cup of coffee and something sweet… ooooo yesssss…… Ouma Babsie’s Caramel biscuits…. the ultimate coffee biscuit….. when you have one, you have 5….. and make it the next day at home…. see recipe under “sweet yummyness the very first recipe I posted on my blog.

I filled those plungers more than 8 times…..

Our lunch ended at 22:00 that night, or let me rather say that was when I called it the day……

Thanks Mike, and Happy Birthday!

Tangy Lemon Loaf….. Linga Longa Cape Point….. Part 3 of 4

A simple luke warm tangy lemon loaf, just what the kids needs after a swim in the icy cold Cape Point sea…..the ideal holiday bake, we’ve baked this loaf in a gas oven, with a door that did not want to close, mixed by hand as we did not have electricity….easy easy…

Freezing waters of Cape Point Nature Reserve….

For the Lemon Loaf you will need:
340g cake flour
pinch of salt
1t baking powder
180g very soft butter
500g castor sugar
1t vanilla
3 eggs
rind of 2 lemons (finely grated)
juice of 1 lemon

For the syrup:
100g sugar
peel and juice of 3 lemons
380ml water

For the lemon icing…
125ml icing sugar
lemon juice and water about 5 tablespoons…

Mixing by hand…

Preheat the oven to 160 degrees and grease a loaf tin. Sift the flour, baking powder and salt. In a different bowl beat the butter and sugar until light and fluffy, I mixed it by hand as we did not have electricity…. it came out perfect, just make sure your butter is very soft.

Add the eggs one at at time to the buttery mixture, add the vanilla and lemon rind. Stir in the milk, lemon juice and flour alternatively until just mixed.

Pauline giving me a helping hand …

Bake for about one hour until a skewer comes out clean and the loaf is nice and brown on top.

While baking make the syrup, simmer together the sugar, lemon peel, lemon juice and water for at least 15 minutes. I’ve peeled the lemons with my potato peeler, try not to get too much of the white bits under the skin…. Spoon the hot syrup and lemon peels over the WARM turned out cake as soon as it comes out of the oven, and let it cool a little bit.

The smell drawing the kids into the kitchen, note the “plan” we had to make to close the gas oven’s door…

At this stage I heard lots of screams of laughter outside the kitchen window, Ben and Emma, the two little ones…. I just had to go and look…

Ben and Emma having fun…

Quickly make the icing to drizzle over the cooled cake … stir together the icing sugar and lemon and water mixture by adding the liquid spoon by spoon to the icing sugar. One spoon at a time until you reach a thick runny consistency… drizzle the lemony icing sugar over the cake.

TEA TIME !!

It took us 5 minutes to polish this little tangy sweet number with some hot tea…

You can keep this lemon loaf for up to 3 days in an airtight container, IF you can keep your fingers out of it…

And tonight, we will be making a quick mushroom and thyme risotto….

Decadent chocolate tart……. part 5 of 5, Nieuview Paternoster

Let me start by saying, this is one of those recipes that will haunt me at night, and my mind will not rest until I taste it again and again…..

We found this “new version” of the Chocolate Tart on The Pretty Blog about two weeks before our weekend away, we did amend it slightly but it introduced us to one magical ingredient….. I think that this tart ended the weekend with a BIG smile on my face, and the secret ingredient, the very simple “nutti crust biscuit base”.

For the Chocolate Tart you will need:
1 x loose bottom fluited quiche / tart tin, preferably one that is about 4 cm high…
400g very fine nutti crust biscuits (a caramel flavoured dry biscuit)
120 g melted butter
200g dark chocolate, chopped finely
300g normal milk chocolate, chopped finely
500ml cream
butter for greasing the tin
A little bit of whipped cream for serving

Preheat your oven to 180 degrees. Grease the tin well with butter. Mix together the fine nutti crust biscuits and melted butter, line the base and the sides of the tin with the biscuit mixture, we used our fingers and a flat bottomed glass to firmly even out the biscuit base, it is quite important to seal the whole bottom and the sides with the mixture as the filling is very liquid and will seep through if the base is not properly lined with the buttery biscuit mixture….

Bake the biscuit base for about 15 minutes, make sure the biscuits don’t turn too brown, all the ingredients are already cooked, but the butter and biscuit mixture needs to “seal” during the baking process…

In a small saucepan, heat the cream until just before boiling point, add the chopped chocolate and stir through, keep on stirring slowly until all the chocolate has melted. Initially it will look as if it won’t melt, but just keep on stirring. It should turn into a glossy chocolate liquid….. If the warm cream don’t melt the chocolate completely, hang the mixing bowl over a pot with hot water, make sure the water in the pot don’t touch the bottom of your bowl… but this should not be necessary… the melting process can take up to 5 minutes so don’t rush it.

Pour this glossy chocolate mixture onto the biscuit base and refrigerate of at least 6 hours….. It should set firmly….

Once set, and ready to serve, remove the side of the loose bottom tin, and with one firm but gentle movement slide the tart off the base of the thin onto a serving platter. Decorate with fresh berries and dust with icing surgar. Serve with a dollop of whipped cream.

Nieuview in the evening light

We closed off this festive weekend with writing messages on sky lanterns and sending them up in the air….

Our “chef” and her hubby…

You cannot turn 40 without a couple of friends dancing for you, this was quite funny and very late…

And this is me, ending my day doing what i love… on the beach, late at night taking pictures of Nieuview….

I could not have asked for a better weekend or a nicer 40th Birthday. Surprising my friends with an early morning kayak trip, a lovely breakfast at a different guest house, a lazy afternoon at the pool and Shannon cooking up a storm for my 40th dinner, sending sky lanterns with messages and taking pictures on the beach at midnight….

If i can have my 40th over again, I will do everything exactly the same…

Just a pity that tomorrow morning we all need to go back home, but Nieuview had a special extra surprise waiting for us…

Nieuview saying “goodbye” … pic taken from the veranda at Nieuview…

Thanks to a very special group of friends for making my birthday a weekend I will remember for the rest of my life..

Chocolate mousse kisses from the deep Overberg….

Celebrating a 60th Birthday on a farm in the deep Overberg with friends and family ……. and then they bowl you over with mindblowing ideas like these decadent chocolate mousse and oreo kisses……

Visuals of an Overberg Farm…

According to Liesel, this is actually Christine’s creation, i did not ask for the recipe but am sure that Christine will let me know if i go wrong….

For the chocolate mousse and oreo kisses you will need:
Oreo biscuits or any similar small chocolate biscuits
Firm chocolate mouse
Whisper balls
Piping bag and a firm hand….

Emma waiting in anticipation…

Make a firm chocolate mousse, the “homemade readymix type” will work perfectly as you can use a bit less liquid in order to get a firmer mousse.

Apparently the only difficult part is to get the oreo biscuits split in two halves, apparently a bit of trial and error, i assume they should not be too cold so that the icing in the middle is soft enough to be able to split the biscuit open, if i recall, Liesel mentioned that the method of firm but gently twist in opposite directions worked the best…..and that a knife pushed inbetween the two halves did not work very well, I would suggest that you buy some “extra” just for in case you take a while to find the best way to split them open.

Split the biscuits open in advance and keep in airtight container to prevent them from going soft.

Overberg farm house visuals…

Just before serving, pipe the mousse with a piping bag onto the halved biscuits, top with a whisper ball.

It will help if someone can hold the biscuit while you pipe as it might dance around….

Serve with heaps of beautifull red strawberries and good coffee….

How pretty is this….

Thank you Liesel and Jan for inviting us to your beautifull home, Liesel, you are one of those truly creative inspirational people in my life, ….