Chocolate Salami with a hint of mint…. at Bosbokfontein Private Nature Reserve…part 1 of 3

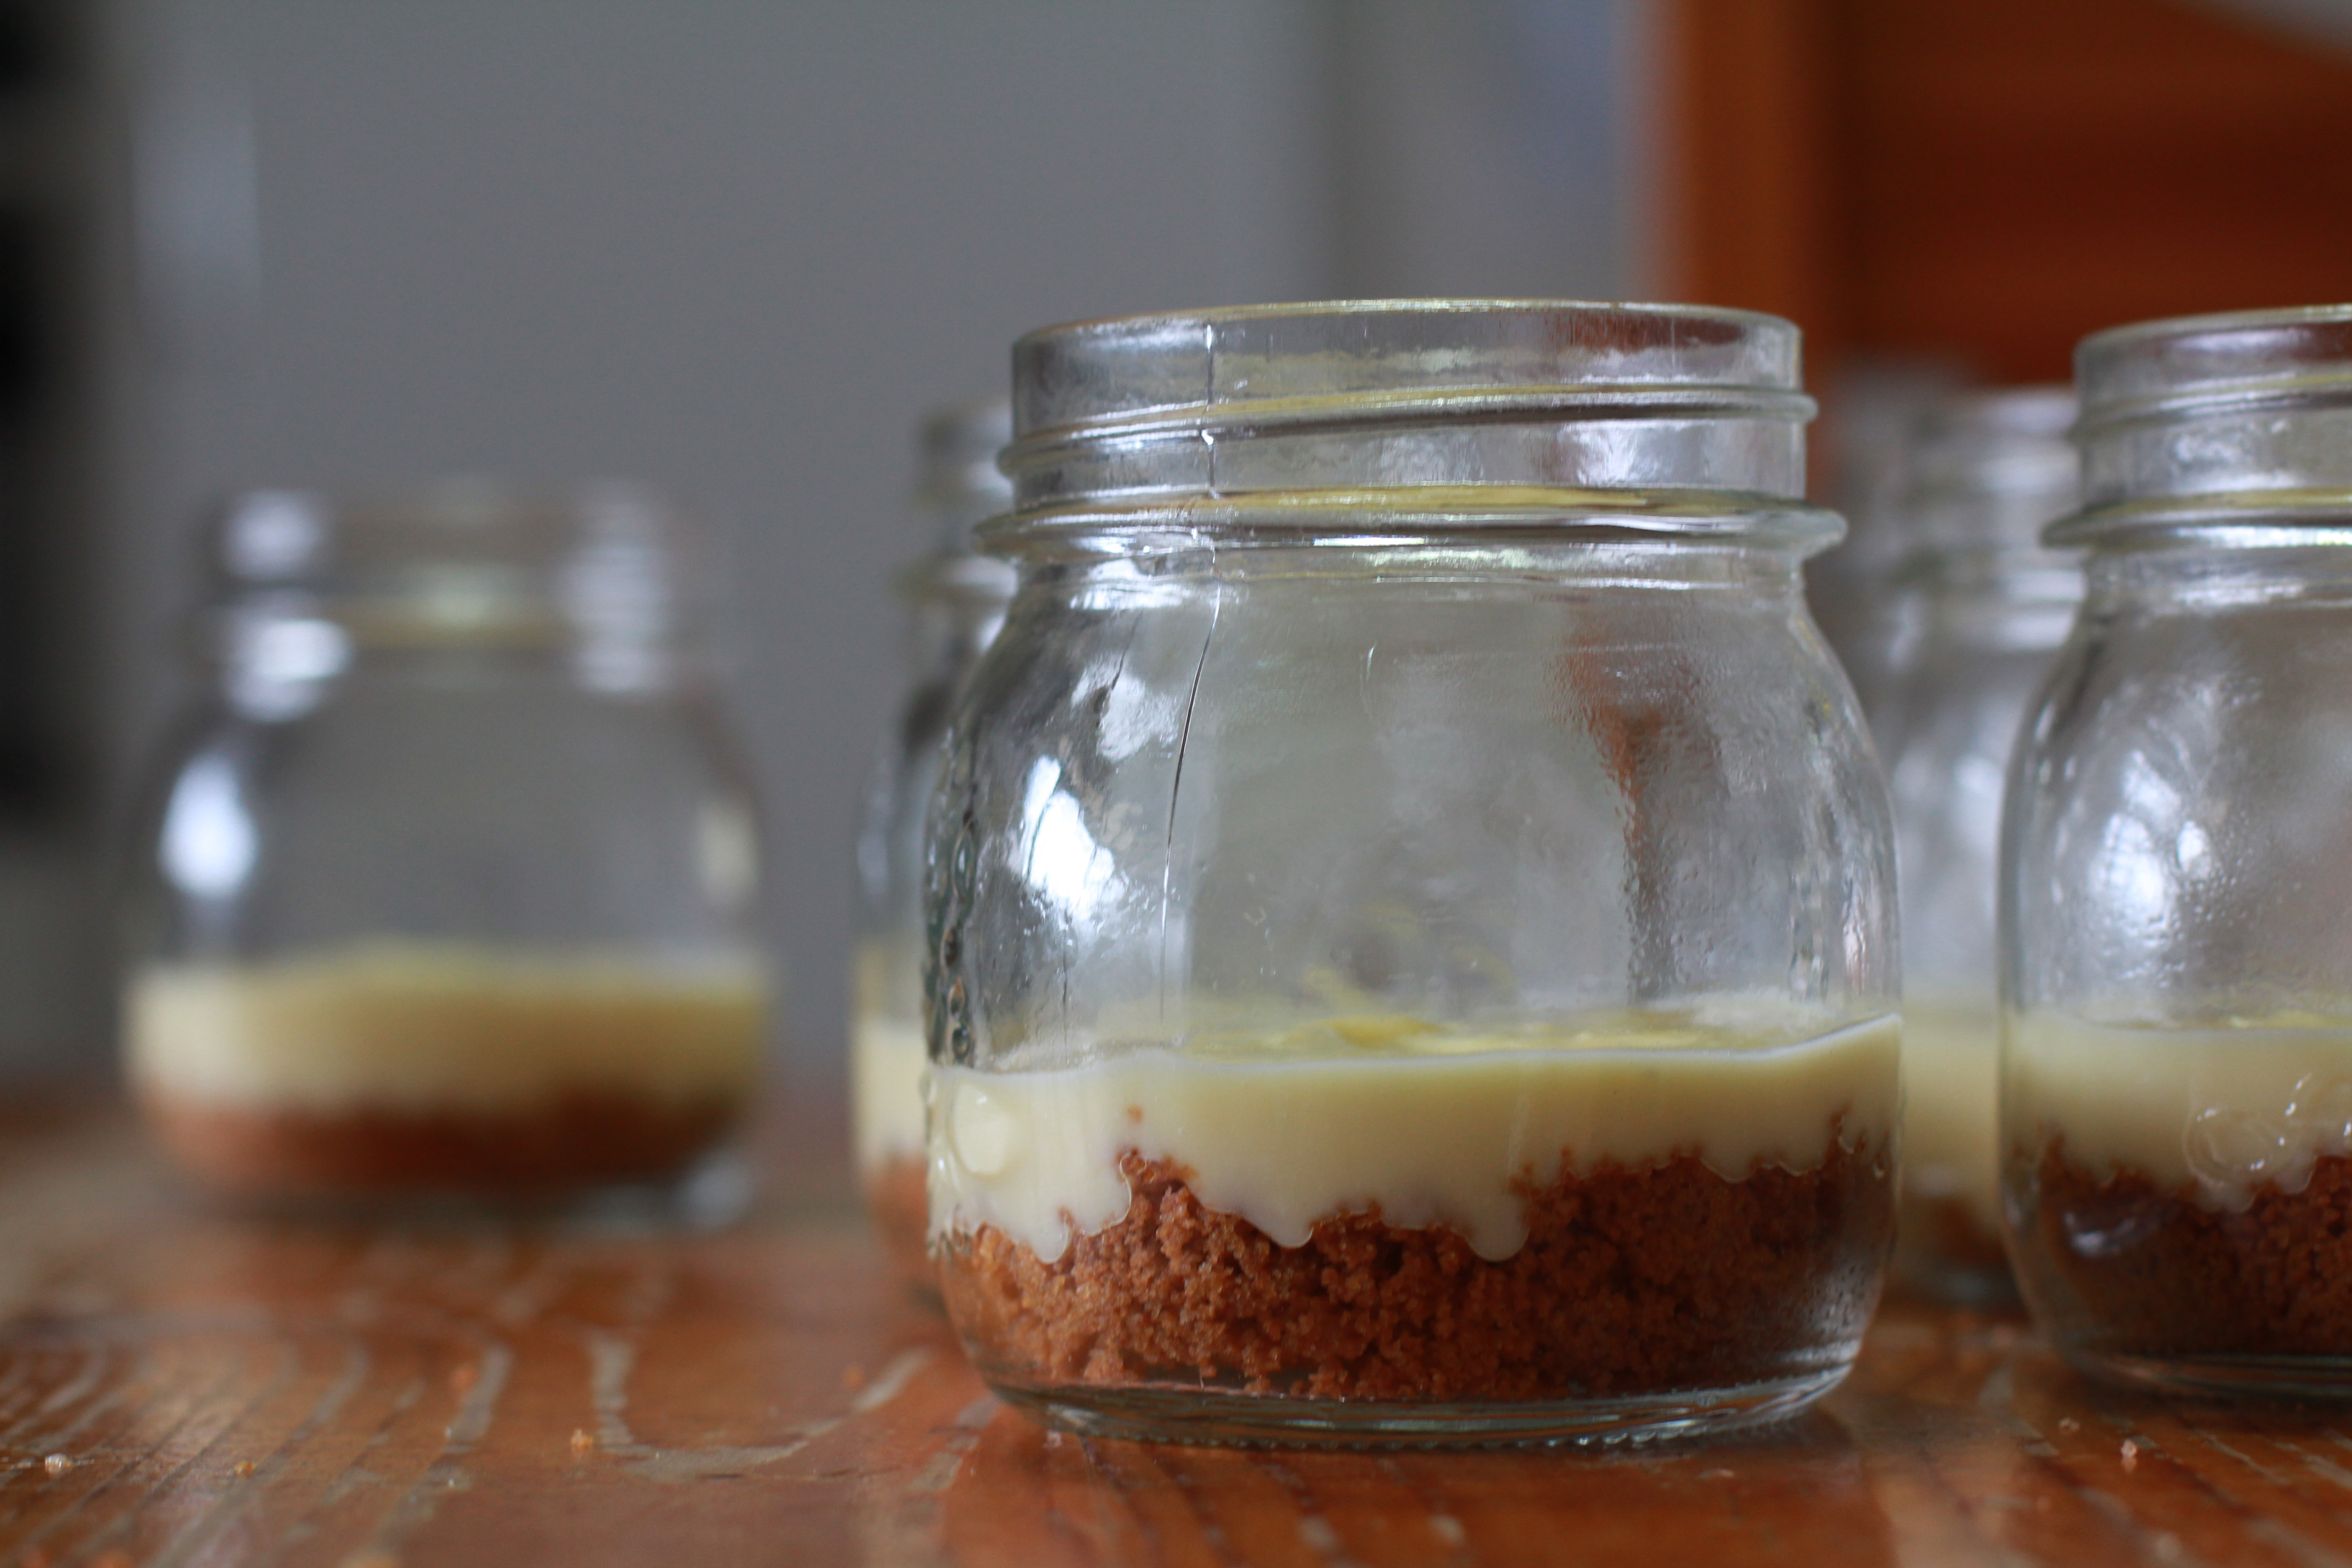
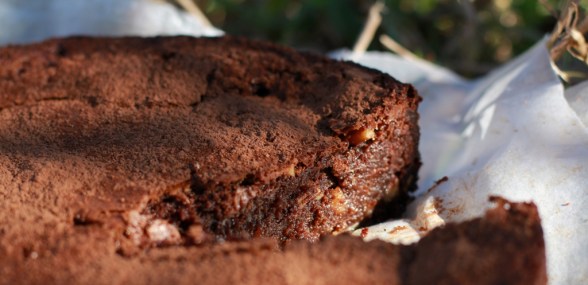
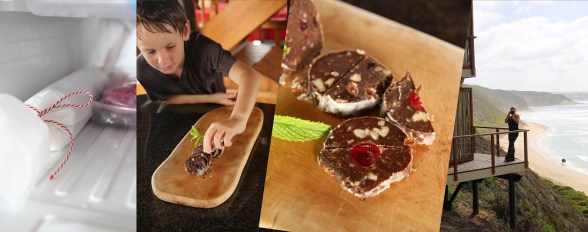
Delicious… a small dessert with a BIG presence… and the perfect little gift for when needed, stored in your freezer, wrapped and ready to go !

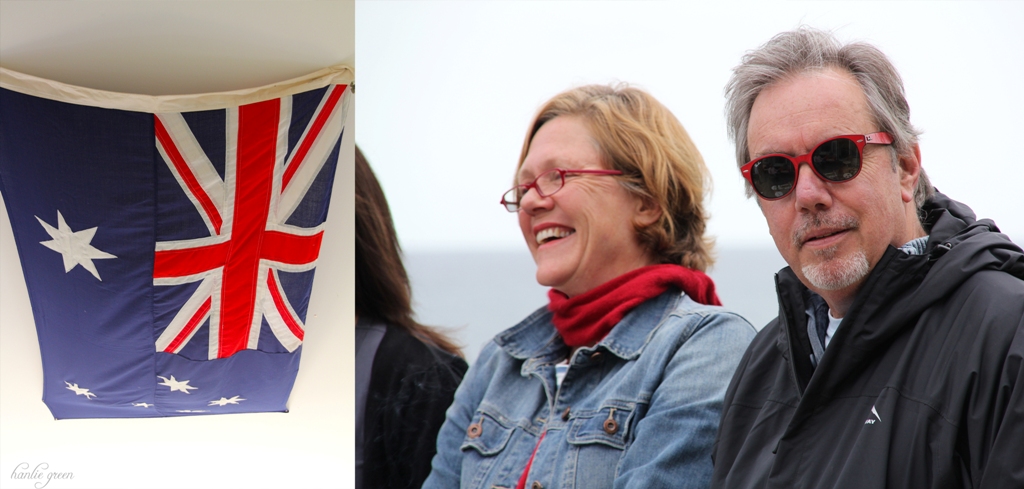
This was our second visit to the beautiful Bosbokfontein Private Nature Reserve…

What a view !!

What a view !!

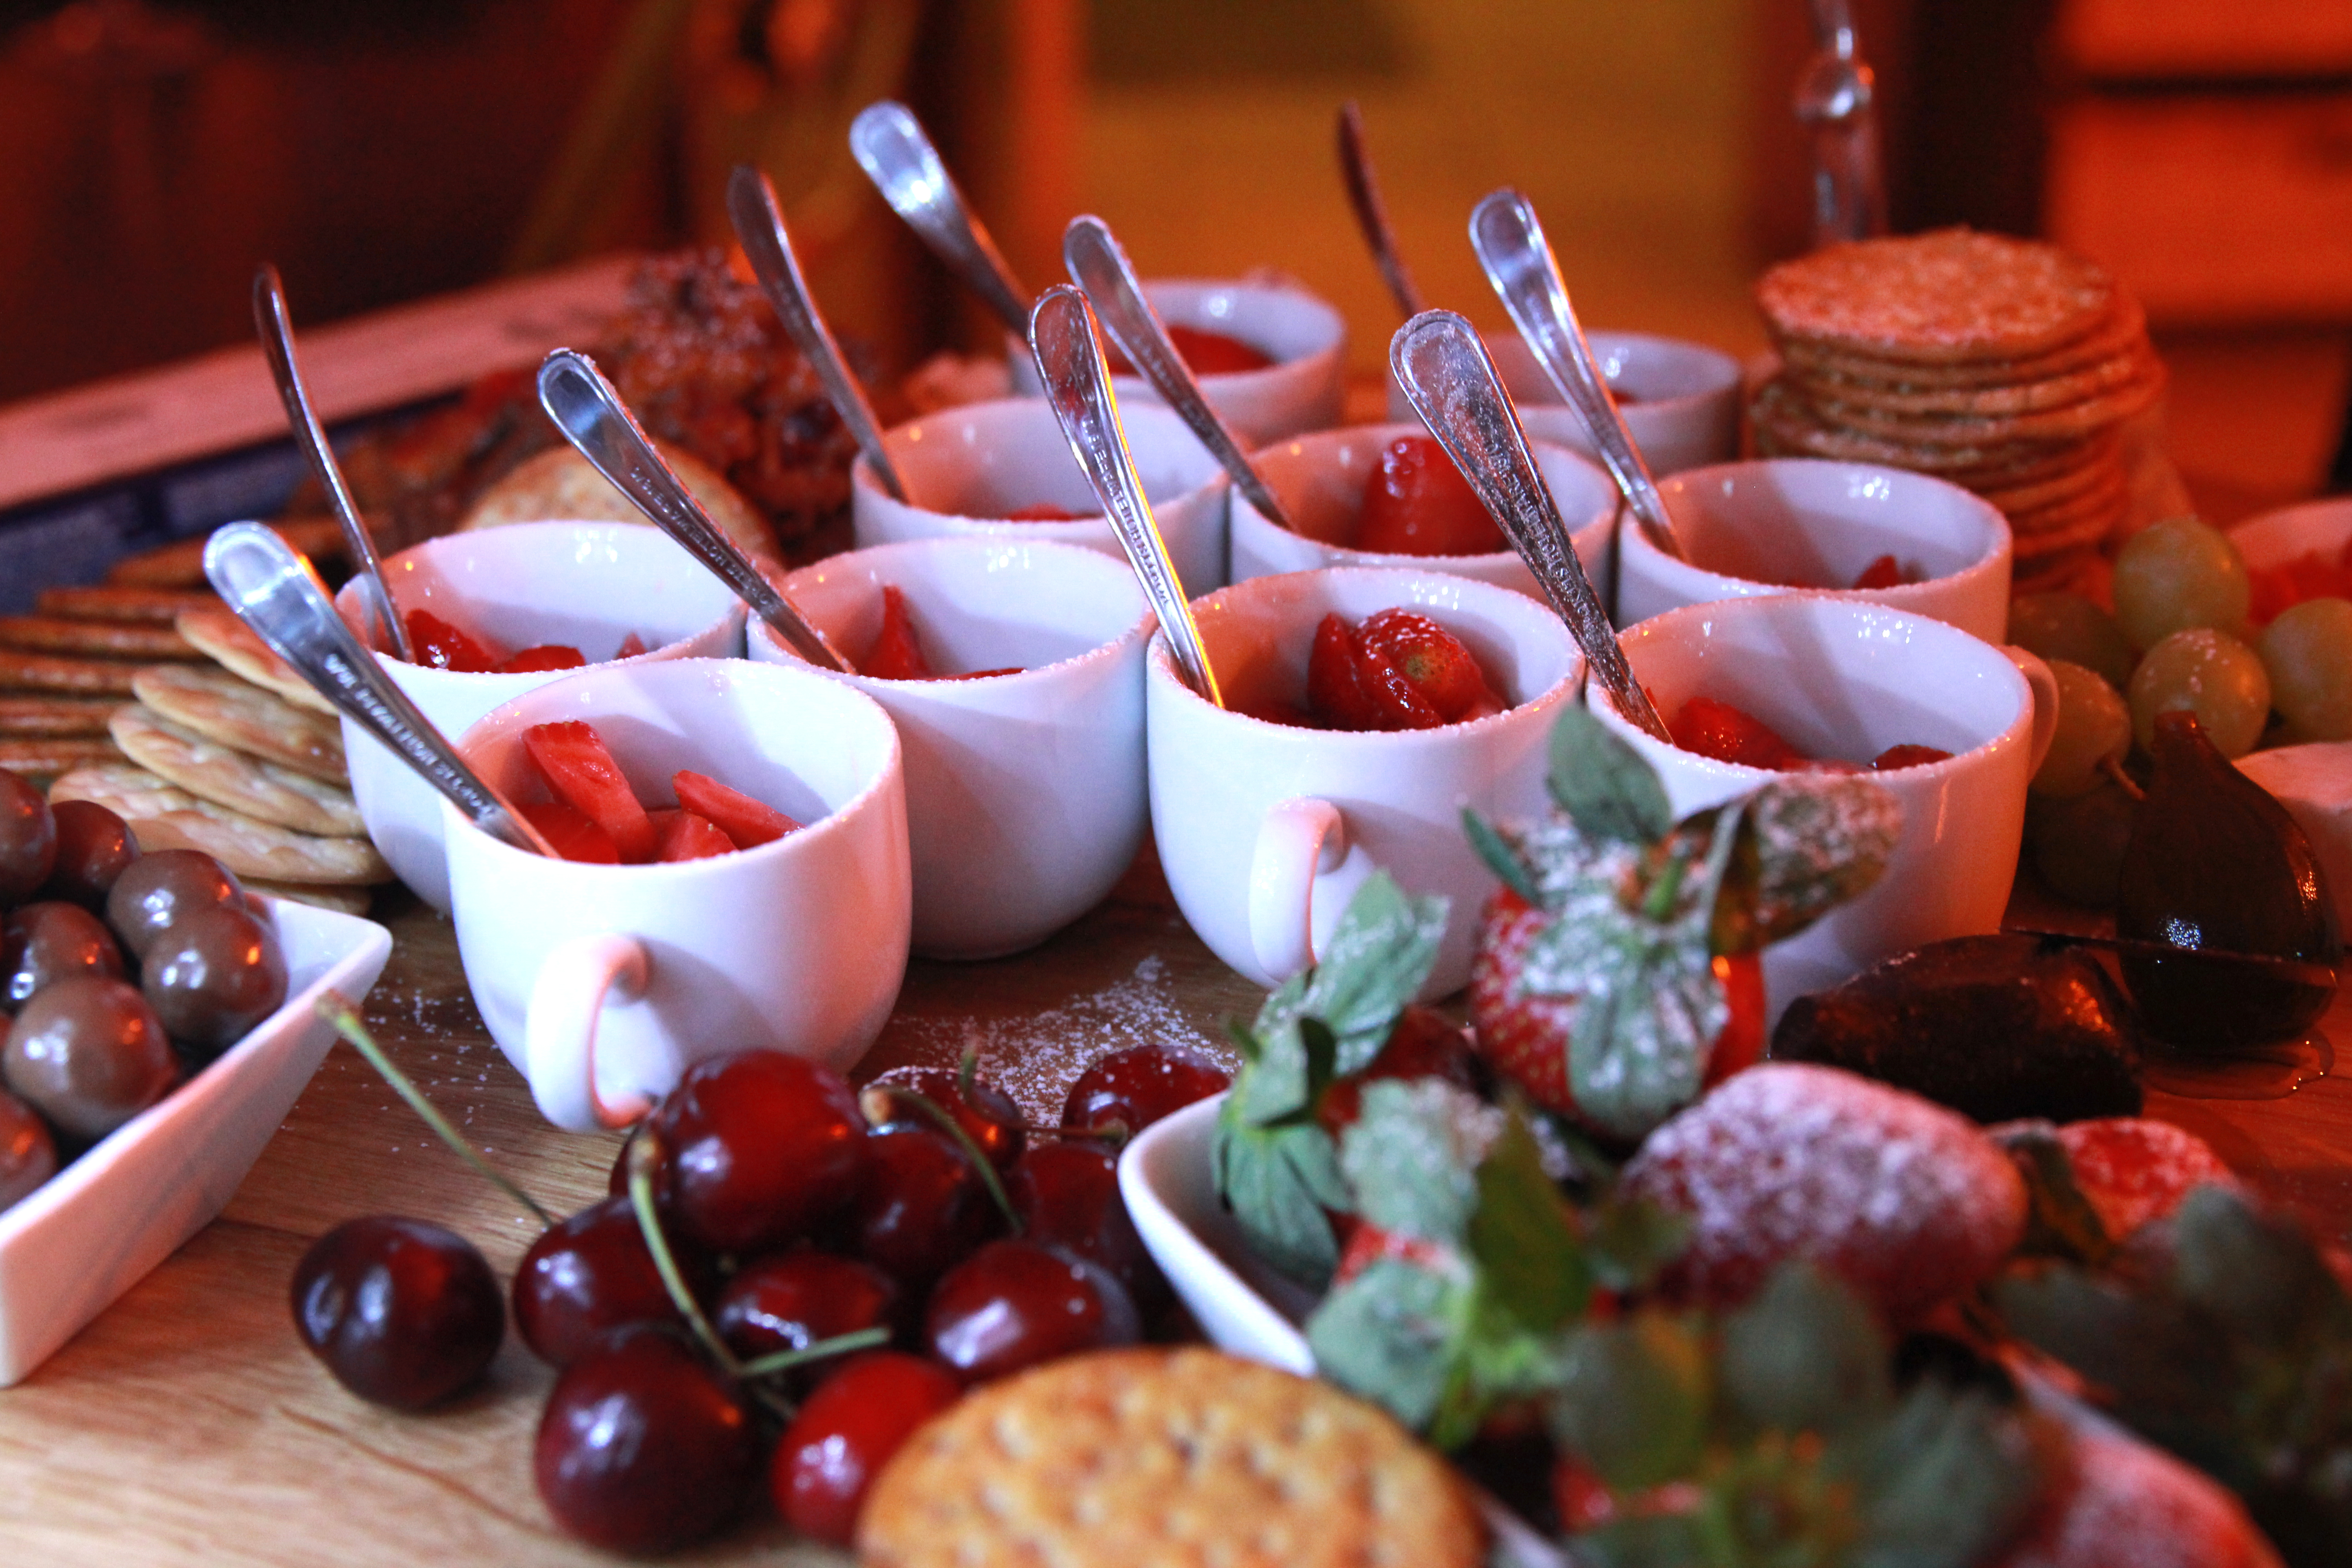
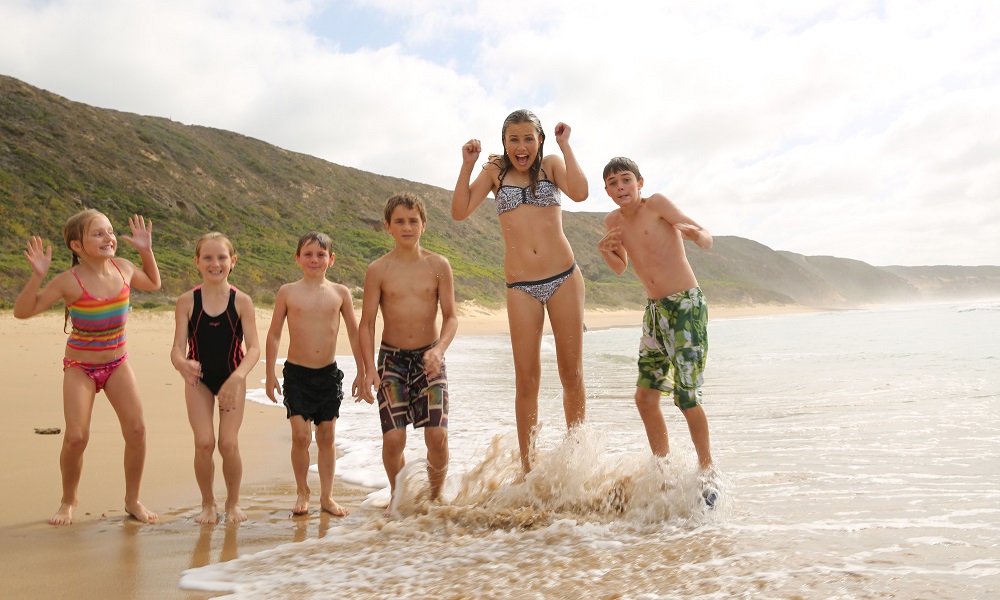
We served the Chocolate Salami for an afternoon coffee treat, after a refreshing swim… sooooo let’s go to the beach..

80. the beach

49. the beach

51. the beach

Time to run up the hill for Coffee and Chocolate Salami…

53. the beach

I made the Chocolate Salami at home and kept it frozen until needed….. no need to defrost…

Click here for a printable PDF recipe card :-> Chocolate Salami with a hint of mint……. RECIPE CARD
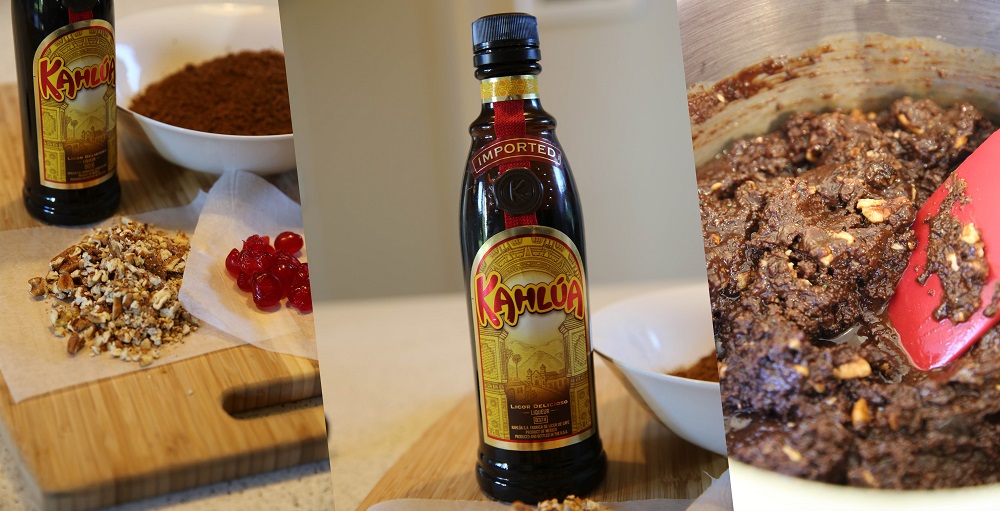
You will need:

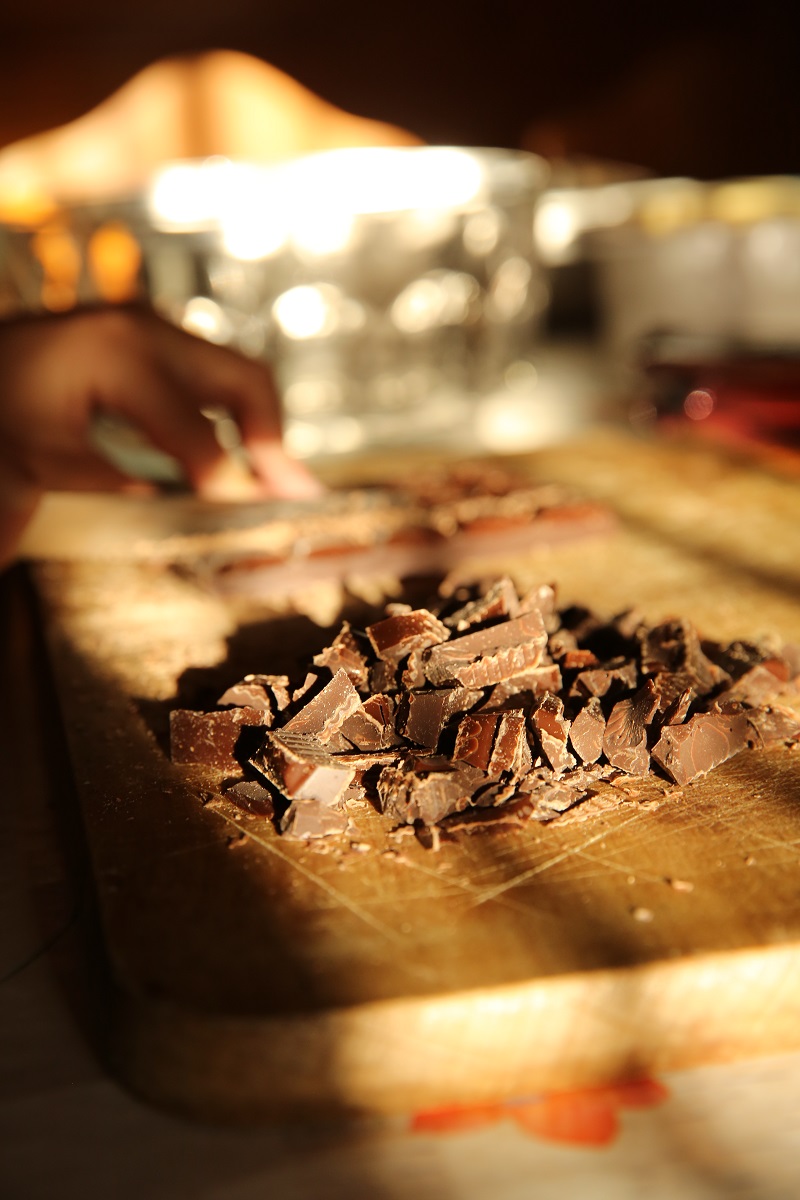
150g chopped dark chocolate
150g chopped fruit and nut chocolate
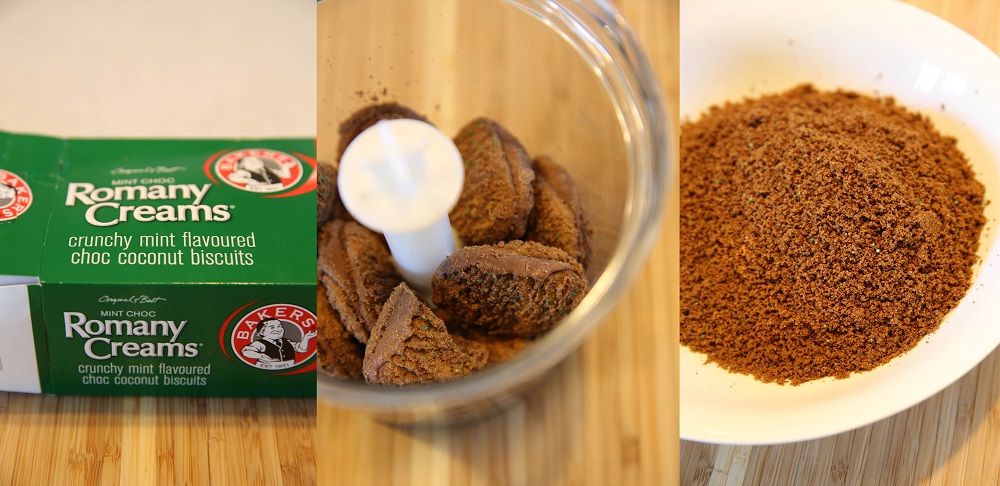
1 x box MINT chocolate Romany Cream biscuits
1/2 cup cream
2 x tablespoons Kahlua Liquor
1/2 cup roughly chopped pecan nuts
+/- 14 glaze cherries
Icing sugar for dusting
Grease proof paper
Pretty ribbon

Blitz the biscuits until very fine..

biscuits

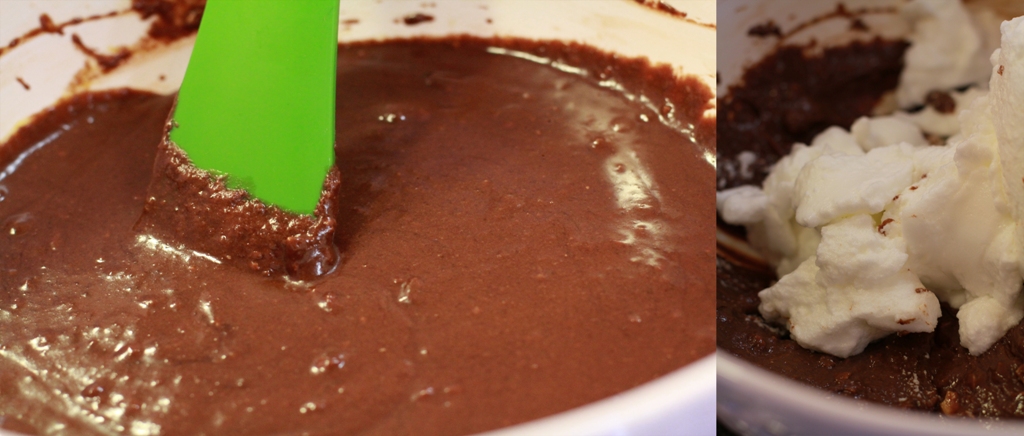
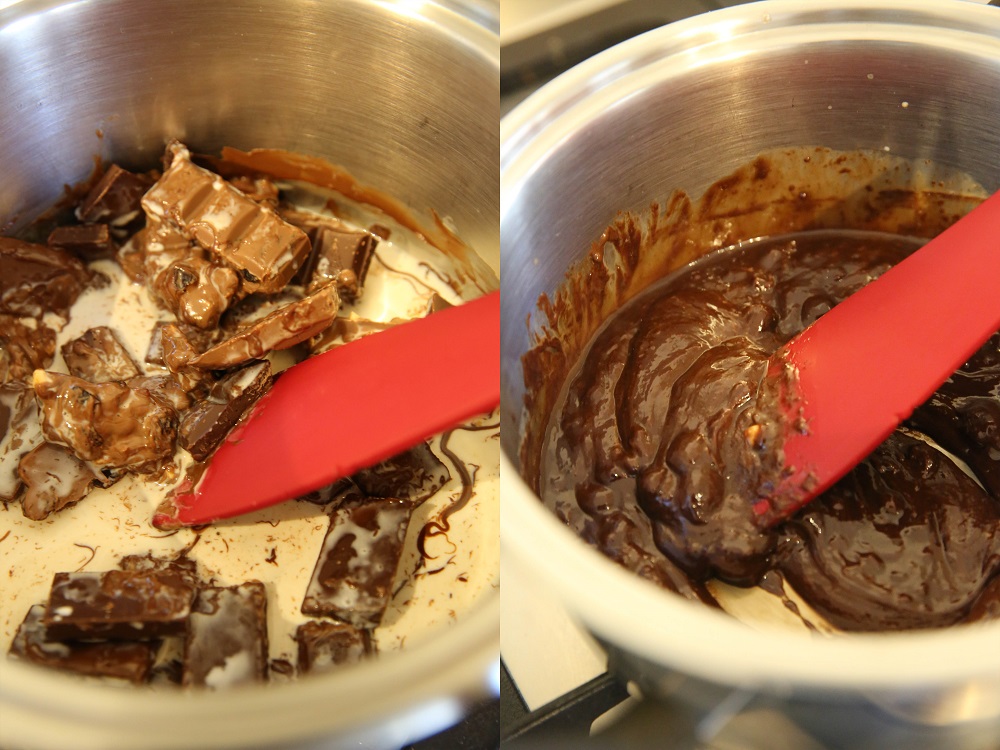
Slowly melt the chocolate and cream on a very low heat in a small saucepan, take off the heat as soon as the chocolate is melted.

melt chocolate

Add the fine chocolate biscuits to the melted chocolate and cream, add the Kahlua and chopped pecan nuts.

kahlua

Let the chocolate mixture cool in the fridge… +/- 1 hour or until it is semi set and can be moulded into a roll. Cut a large piece of grease proof paper and dust with icing sugar.

7E0A7553

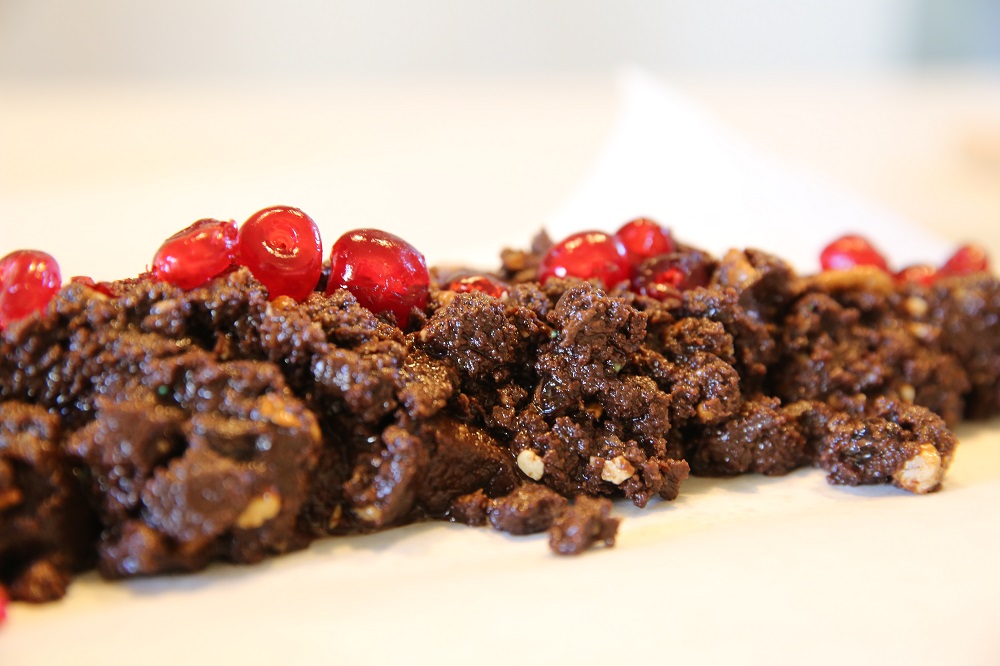
Tip the semi set chocolate mixture onto the icing sugar dusted grease proof paper and mould it into a long cylinder shape. Place the cherries on top and press them halfway into the chocolate mixture.

7E0A7547

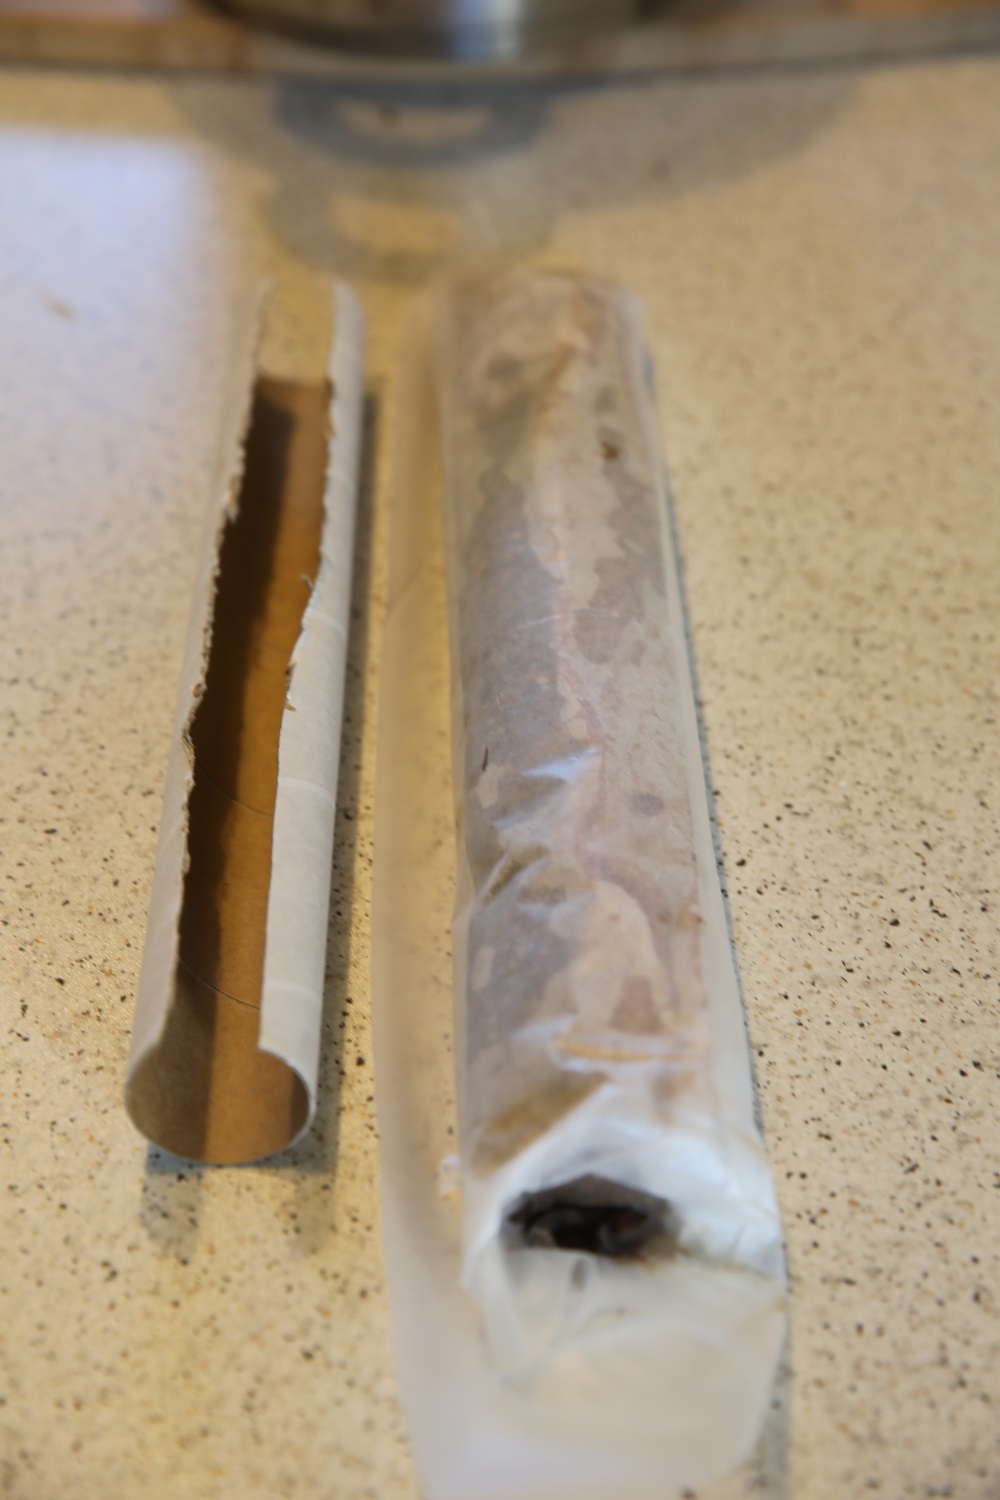
Dust the top liberally with more icing sugar and fold the paper neatly over the roll. I then use a cut open cardboard roll (from glad wrap or foil) to keep the semi soft chocolate salami into share while setting it in the freezer for another hour. Use clothing pegs to keep the ends of the roll closed until more firmly set.

7E0A7550

7E0A7551

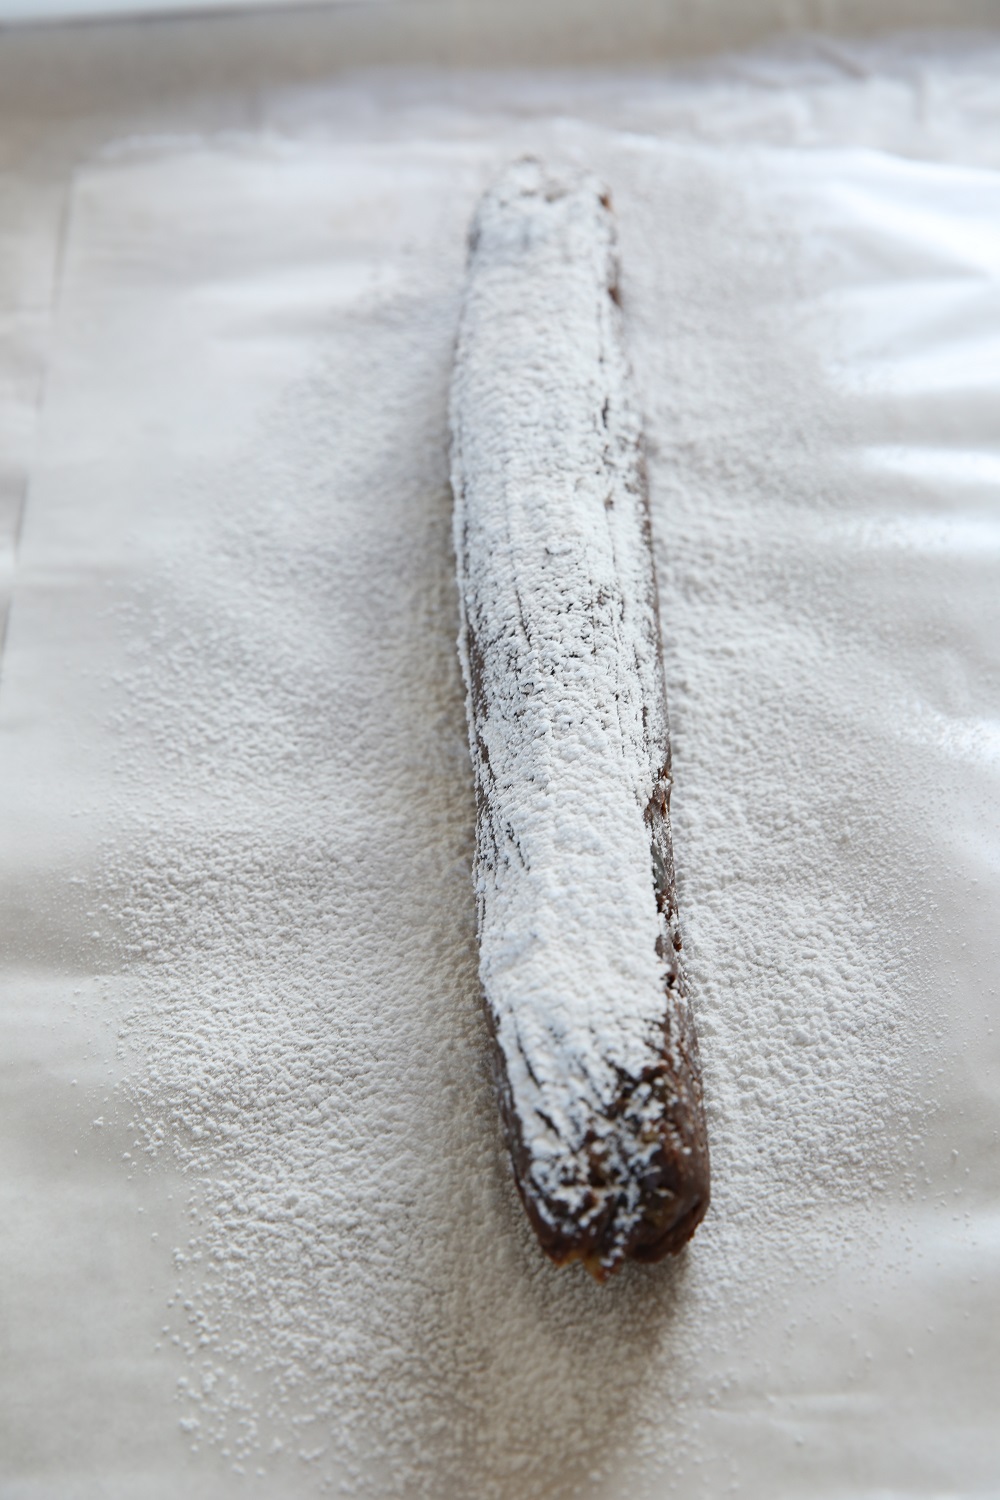
After the salami is set, remove the greased proof paper, it will be a bit sticky but ease it off with the tip of a knife, open another clean piece of paper, dust the paper again with icing sugar, add the salami and top with more icing sugar. This is like a second wrapping, and should be done before the salami is completely set. Once neatly rolled in clean icing dusted paper tie the ends with pretty ribbons, I usually cut the salami in half and have 2 smaller rolls.

7E0A6220

Put the neatly wrapped salami’s into sip lock bags to prevent the paper from getting wet in the freezer, and keep until needed.

7E0A7555

Cut straight from the freezer into +/- 4mm wide rings..

In Willem’s words to us.. “Mamma dis die lekkerste ding wat ek nog ooit geeet het”.

81. the beach

And then it was time for Asta to show the teenagers how to make “real” coffee… what a treat…. their first serious coffee experience overlooking the beautiful ocean, sipping strong coffee and eating minty chocolate salami…

Memories in the making for our children…

83. the beach

84. the beach

Time to get back to the puzzle… what we do at Bosbokfontein… (and a nice gift guests at Bosbokfontein can bring – a reminder for next time)

86. the beach

60. the beach

A little piece of heaven… thanks for the invite… a truly special feel good place…

Quick chocolate fudge… at Rietfontein Private Nature Reserve…. part 2 of 3

As we all move towards less sugar and healthier lifestyles I find it more and more difficult to find dessert recipes that my guests will actually eat and enjoy…

So my thinking plan for the moment is to go “smaller” …. and only offer a couple of bites of sweetness, cut as small as possible….. and I have difficulty with this BUT to always offer JUST enough.. so that everyone yearns for more…

At Rietfontein we woke the house up to the smell of melting chocolate…

2. riet

You will need
4 x cups chopped dark chocolate
2 x tablespoons butter
1/2 x tin sweetened condensed milk (1 tin for truffle filling)
1 x teaspoon vanilla

Line a small size pan with grease proof paper, fold the edges neatly and flat and grease with spray and cook.

Melt the chopped chocolate and butter in a glass bowl hanging over a pot of just boiled water, taken off the stove. Make sure the glass bowl does not touch the water.

7E0A4771

Once melted stir to incorporate the butter and add the condensed milk and vanilla.

7E0A4772

Pour the chocolate mixture into the prepared pan and refrigerate for at least 2 hours.

7E0A4780

While the chocolate sets we all went for a walk to explore the beautiful rocks at Rietfontein…

14. riet

Nothing like a bit of exercise before our long lazy lunch

Nothing like a bit of exercise before our long lazy lunch

39. riet

And then as we got to the top of the hill… we ran back to the house… bushman paintings can wait till tomorrow morning as now it is lunch and gin time!

After a delicious lunch on the Rietfontein front stoep it was time to cut the chocolate fudge… into small small little blocks…

57. riet

And then it was time to pull blankets and pillows outside for a much needed rest..

56. riet

To follow in part 3… Shannon’s slow roasted deboned pork neck and honey butter apples…

When only the best will do, white chocolate pots served with fresh fruit… The Princess turns 40 …. Part 2 of 2

The secret….. keep the servings as small as possible… two to three tablespoons only, and your guests will dream sweet dreams of smooth creamy melt in your mouth heaven….

This is the ideal dinner party dessert, quick and easy make in advance….

Easy and make in advance...

Easy, make in advance…

click on the link for the recipe card in PDF format White chocolate pots ………. RECIPE CARD

For the White chocolate pots you will need:
250 g crème fraiche
250 ml fresh cream
400g GOOD quality white chocolate (I use Lindt or Woolworths organic)
1 x small tub of granadilla pulp
1 x packet crushed nutti crust biscuits
Strawberries OR raspberries

Beautiful strawberries

Beautiful strawberries

Crush the nutti crust biscuits until fine.

For jars, add 2 x tablespoons and for espresso cups, add 1 x tablespoon of fine nutti crust biscuits to each jar/cup.

Slowly mix the cream and crème fraiche until well combined (not whipped). Slowly heat the cream/crème fraiche mixture until near bubbling point. Take off the heat, add the finely chopped chocolate and slowly stir until melted, velvety and smooth.

Make sure you use only the very best white chocolate you can find..

Make sure you use only the very best white chocolate you can find..

Fill the jars or espresso cups with the melted white chocolate mixture, make sure you only fill them maximum half way, or less….

Don't over fill

Don’t over fill

Refrigerate until needed….

If you use strawberries, slice them into quarters and stir in the Granadilla pulp, refrigerate and add to the cups before serving. If you use raspberries, top the jars just before serving with the raspberries and spoon over some of the granadilla pulp.

While I topped the espresso cups, the girls got ready for a quick family shot..

Time for a quick family shot...

Time for a quick family shot…

Just lovely I think..

Just lovely I think..

We served the white chocolate espresso cups as part of a cheese platter… it looked beautiful and decadent and was a great end to an even greater evening…

Dust with icing sugar..

Dust with icing sugar..

The cheese platter with White Chocolate espresso cups

The cheese platter with White Chocolate espresso cups

I use the small jars with a lid for a sweet surprise at a picnic, see the pic below… at the Paul Cluver Amphitheatre. I cannot wait for this year’s summer concerts under the stars in the forest… pure magic…

Picnic dessert jars...

Picnic dessert jars…

Evie, the lucky recipient of a White Chocolate Jar at the Paul Cluver Amphitheatre...

Evie, the lucky recipient of a White Chocolate Jar at the Paul Cluver Amphitheatre…

Come on summer!!

Let the countdown begin to this year's summer concerts...

Let the countdown begin to this year’s summer concerts…

Homemade ice cream and meringue blueberry pots….Part 2….. Cooking for Jacques and testing recipes for Christmas Lunch

I could not wait to try out this new idea, originated from the Zest kitchen at Beaumont Wines, I love jars, any kind of jar and to serve food for a picnic or dessert like this is visually appealing to me.

The pots have layers of ice cream, broken up meringues (see part one), and a berry coulis, this is my “attempt” to re-create the Zest Jars… o and if you EVER need a great catering team, they are THE BEST!

For the little ice cream jars you will need:
Ice cream
410g evaporated milk, this must be very cold
250ml castor sugar
250ml double thick cream (I used normal whipping cream)
5ml vanilla essence (I used vanilla extract or a pod, just love the little black seeds)

Blueberry coulis
3 cups fresh or frozen blueberries
1.5 cups water
200 ml castor sugar
30 – 50ml of fresh lemon juice (to taste)

Gooey meringues
See part 1 for the gooooey meringue recipe, you can buy the meringues but please don’t get the white powdery ones, make sure it is a good quality meringue.

AND little jars for serving…

No 2. homemade icecream and mreinge post

For the ice cream, (recipe found it in one of our Local Magazines….) whip the evaporated milk, I prefer to use my Kenwood for this, you need a powerfull mixer to beat the evaporated milk into a cloud. Once thick add the castor sugar spoon by spoon, make sure you mix well after each spoonful, whip the cream seperately and fold into the whipped evaporated milk and sugar. Finally add the vanilla extract… and fold through. Pour into a chilled plastic container and freeze immediately, no need to stir this icecream like some recipes suggest, it is perfect….

Local grown blueberries from Lorraine Farm

Local grown blueberries from Lorraine Farm

Now for the berry coulis, boil together 3 cups of blueberries with 1.5 cups of water, for +/- 7 minutes. Use a potato masher and mash the cooked watery blueberries, this will crush open the soft blueberries and release the insides. Then strain them over a sieve to get rid of the skins, I use the back of a spoon to press the skins and force every little bit of liquid through the sieve. Now boil the strained runny blueberry liquid with 200ml of castor sugar for about 10 minutes until slightly reduced. Add the lemon juice and taste, add more if not sour enough, you want it sour as that is what works like magic with the sweet meringues and ice cream.

You need to give the icecream about 5 hours to freeze and the blueberry coulis needs to be cold…. THEN we pack the jars….

The process of packing the jars...

The process of packing the jars…

Pack layers of flat crushed gooooey meringue, layers of ice cream and the blueberry coulis, and another layer of flat crushed gooooey meringe , ice cream and blueberry coulis….. and freeze, I did not put the lids on the jars as I was worried that the lids will rust… and what is great, you can make everything up to this point a day in advance, even two if you want. I’ve kept one jar out for Mr Huxter, my blueberry grower and ice cream fanatic, and only managed to get it to him 4 days later, and need I say that there was a little bit of a fight over who’s spoon goes in first between him and Issie…

My good friend, suggested we add some mint to add colour to my pics...

My good friend, suggested we add some mint to add colour to my pics…

At dessert time, all you need to do is remove the jars from the freezer and serve, add frozen or fresh whole blueberries on top and mint for pretty pics as Shannon said.

Someone could not wait for their jars...

Someone could not wait for their jars…

These jars seems to be a bit of an effort, and to be honest they are, but really easy and so worth it…

The secret is in the quality of the meringues and icecream, you can go the quick way but believe me the taste of the homemade version is just soooooo worth it.

No 7. homemade icecream pots

Jacques, next time I will serve the ice cream jars as the “starter” then you can take your time enjoying them as there won’t be any need to rush to catch that plane back to Johannesburg…

No 8. homemade icecream pots

What a wonderful idea, thanks to the Zest girls….

Printable PDF recipe card, click on the link below…
8. Ice cream, blueberry and meringue jarsRECIPE CARD

Gooey meringues… Part 1…… Cooking for Jacques and testing recipes for Christmas Lunch…

I’ve tried and tested this recipe several times before I got the timing right, yes the goooooeyness is all in the baking time…..

We invited Jacques, a brother of a GOOD FRIEND, for lunch, and what better time to try out those frozen homemade icecream and meringue pots I’ve ordered from the Zest Kitchen at The Beaumont Wines’s open gardens day in early November…. I don’t have the recipe but will give it a go….

It start with baking gooooey meringes

For the Gooooey meringes you will need:

8 egg whites at room temperature
240 g castor sugar
240 g sifted icing sugar
5ml of cacao powder
2.5ml vanilla paste or half scraped out vanilla pod

Seperate the eggs and beat the egg whites until soft peaks. Mix together the castor sugar, icing sugar and cacao and spoon tablespoons full of the sugary dry mixture into the egg whites while continiously mixing, I use my Kenwood on a high speed, but you can use any “freestanding” electric mixer.

By slowly adding the dry ingredients while continiously mixing, the egg whites will turn into a shiney stiff sugary cloud…. mix in the vanilla…

Preheat the oven to 120 degrees.

Spoon egg size dollops of meringue onto a baking tray, I prefer not to use baking paper for these. Use two tablespoons, and scrape the egg size dollop out of the other spoon onto the try, make a twirly point at the top of the meringe by circling the meringe with one of the spoons.

The meringues will double in size, so make sure you leave enough space so they don’t “climb on top of each other”.

Bake for 1 hour 15 minutes at 120 degrees. Do not open the oven door, leave to cool for 2 hours before taking them out.

After 2 hours, remove the meringues from the oven and store in an airtight container.

Click on the recipe card in PDF for a printable recipe card.
Gooooey Meringues RECIPE CARD

And this is what these meringues turned into, recipe to follow later…

Gooey meringe, homemade icecream and blueberry coulis pots…

Chocolate mousse kisses from the deep Overberg….

Celebrating a 60th Birthday on a farm in the deep Overberg with friends and family ……. and then they bowl you over with mindblowing ideas like these decadent chocolate mousse and oreo kisses……

Visuals of an Overberg Farm…

According to Liesel, this is actually Christine’s creation, i did not ask for the recipe but am sure that Christine will let me know if i go wrong….

For the chocolate mousse and oreo kisses you will need:
Oreo biscuits or any similar small chocolate biscuits
Firm chocolate mouse
Whisper balls
Piping bag and a firm hand….

Emma waiting in anticipation…

Make a firm chocolate mousse, the “homemade readymix type” will work perfectly as you can use a bit less liquid in order to get a firmer mousse.

Apparently the only difficult part is to get the oreo biscuits split in two halves, apparently a bit of trial and error, i assume they should not be too cold so that the icing in the middle is soft enough to be able to split the biscuit open, if i recall, Liesel mentioned that the method of firm but gently twist in opposite directions worked the best…..and that a knife pushed inbetween the two halves did not work very well, I would suggest that you buy some “extra” just for in case you take a while to find the best way to split them open.

Split the biscuits open in advance and keep in airtight container to prevent them from going soft.

Overberg farm house visuals…

Just before serving, pipe the mousse with a piping bag onto the halved biscuits, top with a whisper ball.

It will help if someone can hold the biscuit while you pipe as it might dance around….

Serve with heaps of beautifull red strawberries and good coffee….

How pretty is this….

Thank you Liesel and Jan for inviting us to your beautifull home, Liesel, you are one of those truly creative inspirational people in my life, ….

Meringue mess at the House of Eels, Vermaaklikheid part 2 of 2

Continue from part 1 of 2 ….

So do you really want to know what the kids caught in the Eel room below the house…. while they waited for dessert? Maybe i should rather keep to the dessert…

Elzaan’s mojito’s out of a “box” with blueberries and mint…

For the Meringue Mess you will need to following:

4 packets of meringues, i like to use soft colours like cream, pink and purple.
(try to get good quality meringues or bake some yourself, they need to be goooey inside and not dried out completely)
1 tub of fresh cream
2 x 250g punnets of blueberries
1 x large punnet of strawberries
1 x flake (optional)
4 x tablespoons of sugar
some lemon juice

Visuals of the House of Eels

Make the Blueberry sauce:

Boil together one punnet blueberries, 4 tablespoons of sugar and 3/4 cup of water for +/- 8 minutes.
Strain the hot blueberry sauce through a sieve, and push as much of the blueberry pulp through the sieve with the back of a spoon. Add a BIG squirt of lemon juice and reduce further by simmering for another 10 – 15 minutes to get a rich black shiney slightly thick sauce. Let this cool completely (make in advance if possible).

Use a BIG bowl, and mix together the 4 x packets of meringues (break them up a bit), one tub of whipped cream, 1 punnet of fresh blueberries 1 punnet of halved strawberries, and the homemade blueberry sauce. It is important not to mix the ingredients too much, basically give it 2 stirs and that should be enough otherwise it might get too messy. You should still be able to see the individual ingredients …..

Serve on a BIG white flat platter as this is one of those visual feasts…. sprinkle with flake or chocolate shavings….

After dessert we all walked down to the river ….

This is such an untouched piece of paradise…

And when the sugar rush hits a HIGH, trust Bruce to take the team for a “penguin walk / dance” through the house while the “penguin song” blares over the Duivenhoks Valley….

The “penguin walk to the penguin song” don’t ask me what the song is really called , i have no clue…

Creamy Lemon Tart, at Natanya, part 2 of 2

Continues from part 1 of 2, Natanya Birthday weekend…..

After a lovely lunch, featured in part one, we’ve moved on to the outside deck, overlooking the sea….

Natanya views…

This lovely tangy creamy lemon tart was the first item we’ve put on the menu during the weeks planning our weekend, as Shannon knows, this is my favourite dessert for any “special” meal…

The base was made the afternoon before.

For the Rich short-crust pastry you will need:

250g plain flour
175g butter
1 egg

Rub the flour and the butter together, until the mixture resembles breadcrumbs.
If using a food processor, be careful not to over mix.
Beat the egg and add to the mixture. Mix till it forms a ball, and let the pastry rest for 20 minutes.

Waiting for the pastry to rest, Shannon enjoying one of several glasses of Genevieve MCC

Roll out the dough on a lightly floured cold surface. Line a greased 24cm loose bottom flan / quiche dish. Quiche dish works better as it is deeper. Let the pastry rest for another 30 minutes in the fridge, this helps that the pastry don’t shrink.

For the filling you will need:

6 extra large free range eggs (in Elgin we “free range” everything)
250ml castor sugar
120ml lemon juice
10ml finely grated lemon rind
160ml cream

Blind bake the pastry at 200 degrees centigrade for 10 – 12 minutes or until lightly brown.

Reduce the temp to 150 degrees.

Beat the eggs and sugar. You want a nice creamy mixture. An electric beater or processor makes it easier. Stir in the lemon juice and rind. Whip the cream until stiff and gently fold into the egg mixture.

Pour into the base. (bake tart on a solid baking tray… when adding the egg filling to the base leave tray and tin in the oven, pull out the shelf half way and pour in the filling, LESS MESSY)

Bake for 30 – 35 minutes until set but still slightly wobbly.

Cool, and remove from tin. (so here i’ve asked Shannon, what do i call this tin, tart pan, quiche tin, and she answered “you call it ‘tin’, and if they don’t know what that is they should not be in the kitchen….)

Dust with icing sugar once cooled completely. (You can bake this tart up to 6 hours before you want to serve it, do not refrigerate, and serve at room temerature)

Lemon tart and our new favourite “wax paper” for serving

We’ve served this Creamy Lemon Tart on sheets of wax paper, with heaps of strawberries and marscapone… AND glasses full of Genevieve MCC, a match made in heaven…

Guests…

The guests stayed till late to watch the beautifull sunset…

Natanya sunset…

Natanya sunset…

And the next morning we could not wait to sit on the “stoep”, with mugs of coffee and the last little piece of CREAMY LEMON TART…looking at the pictures….

The morning after the LUNCH before…

NATANYA, the food, the friends…………

Chocolate Fudge Tart

Earlier this week Shannon forgot to pick Abby up from school, o dear, she felt so bad about forgetting her that i got a delivery the next morning on my desk at the office….

One little slice of this heavenly chocolate tart. Luckily it did not take a lot of convincing to let her make it again for me this morning.

For the Chocolate Fudge Tart you will need:

240g unsalted butter cut into small blocks at room temerature and slightly soft
360g dark chocolate, we’ve used Albany with slivers of almond (don’t use chocolate with big pieces of nuts, if you don’t find the one with almond slivers, then use plain dark chocolate)
290g light brown sugar
4 tbsp water
5 large freerange eggs
pinch of salt
50g finely chopped pecan nuts
cocao powder for dusting
Double thick cream for serving but this is really optional…

Greasing the tin…

Preheat the oven to 170 degrees..
Grease a 20cm springform cake tin, or slightly smaller tin, don’t go bigger…
Put the sugar and water in a small saucepan and dissolve the sugar and bring to a rolling boil for about 1 minute or until all the sugar is dissolved, don’t boil too long, it should not go brown.

Bring the sugar and water to a rolling boil…

Place the dark chocolate and butter in a large heatproof mixing bowl, make sure the chocolate is broken into small pieces as the warm sugary water needs to melt the chocolate and the smaller the chocolate and butter, the easier it will melt.

Chocolate and butter

By now the sugar should be reaching a rolling boil, remove from the heat and slowly pour the bubbling sugar and water mixture over the chocolate and butter pieces.

Melted sugar reaching a rolling boil..

Don’t stir, let it rest for about one or two minutes.

Melting butter and chocolate

Slowly start to stir the mixture, don’t panic if it looks grainy, it should come together, just let it rest for another couple of minutes and stir again, untill the butter is completely dissolved. It is important for the butter to be at room temperature and soft otherwise it won’t melt into the chocolate.

Seperate the eggs, stir the egg yolks into the chocolate mixture and allow it to cool completely.

Adding the egg yolks…

Chop the pecan nuts fine, we prefer them fine to prevent them from dropping down to the bottom of the cake, add to the chocolate mixture.

Chopped Pecan Nuts…

Whisk the egg whites to form firm peaks, add the pinch of salt to the egg whites, slowly fold into the cooled chocolate mixture, don’t over mix.

Pour 2/3rds of the mixture into the greased loose bottom tin, remember ONLY 2/3rds of the mixture as strangely this is a double baked chocolate tart… not too sure why but it works…

Spud and the chocolate tart…

In the tin… and leave some mixture for later…

Bake in the pre heated oven for 40 minutes, remove the cake from the oven and allow to cool.

At this stage we’ve had some tea on the stoep, overlooking the beautifull Elgin Valley…. and gave Spud the attention he demanded the whole morning while we were busy in the kitchen..

Having a cup of tea, overlooking the Elgin Valley..

Spud..

As we walked back into the house, Shannon asked me {DOES THAT CAMERA OF YOURS HAVE A SMELL SENSOR? AS IT WILL FLIP THE ROOF WHEN YOU WALK BACK INTO THE HOUSE! And believe me, the smell of warm baked dark chocolate hits your sense like you cannot believe…

Once the cake is cooled, gently push down the cracked top with anything flat, gently and just slightly, then pour over the remaining uncooked chocolate mixture (the last 1/3rd). Return the cake to the oven and bake a further 30 minutes.

The “second” bake…

I find this “raw batter” being baked on the “baked tart” quite strange, but magically this really works to give it a fudgy gooey consistency at the end…

The Second bake..

Keep to the baking times of the cake , the skewer should not come out completely clean as the cake still needs to be gooey inside.

Testing the second bake..

Leave the cake to cool completely in the tin, at this stage I sadly had to go home, so Shannon packed the warm cake safely into a box for my journey home.

For the yourney home…

Once home, I’ve let the cake cool completely before I’ve turned it out.

Dust with cocoa and serve as is, or with a dollop of double thick cream…

Chocolate Fudge Tart…

This tart can be made the day before, just don’t put it in the fridge, I would prefer to make it in the morning before you want to use it, as i think that nothing tastes like “freshly baked” warm chocolate…

Chocolate Fudge Tart..

Enjoy, i can just imagine that this will work well for a packed picknick as well…