Big boy’s Birthday surprise!

This blog is not only about recipes and photography, it is about ideas i like and inspirational people in my life. Evelyn is one of those creative, inspirational, artistic friends….. when she plans a party, it will be different and as we can see in this “Big boy’s Birthday surprise” post, a great idea does not always have to cost a lot, it is the IDEA that counts, the different’ness from the rest….

About a year ago, Evelyn told me that she want’s to surprise her husband and his cycling friends with a picnic high up in the mountains… when Evie wants to do something, she makes it happen, and what better time to do it on the morning of Albert’s birthday. The friends who went cycling with Albert on his Birthday got more than what they bargained for, and Albert got a “new bike” from his friends and family about 5 minutes before the start of the ride.

I assume I don’t have to say how much fun me and Evie had, rushing up the mountain, getting the table ready before the first cyclists arrive at “the spot” we told them to cycle past…

Luckily we were very high up and could see them coming from far…

A quick stretch by the “Dr” on hand….

Let me tell you these guys could not believe their luck, i am sure they all thought that they also want a “birthday, cycle, picnic surprise” for their birthdays…. Evie, please keep these ideas coming, it is THAT DIFFERENT IDEA and the little bit of extra effort that makes memories forever like this one surely will be….

Chocolate mousse kisses from the deep Overberg….

Celebrating a 60th Birthday on a farm in the deep Overberg with friends and family ……. and then they bowl you over with mindblowing ideas like these decadent chocolate mousse and oreo kisses……

Visuals of an Overberg Farm…

According to Liesel, this is actually Christine’s creation, i did not ask for the recipe but am sure that Christine will let me know if i go wrong….

For the chocolate mousse and oreo kisses you will need:
Oreo biscuits or any similar small chocolate biscuits
Firm chocolate mouse
Whisper balls
Piping bag and a firm hand….

Emma waiting in anticipation…

Make a firm chocolate mousse, the “homemade readymix type” will work perfectly as you can use a bit less liquid in order to get a firmer mousse.

Apparently the only difficult part is to get the oreo biscuits split in two halves, apparently a bit of trial and error, i assume they should not be too cold so that the icing in the middle is soft enough to be able to split the biscuit open, if i recall, Liesel mentioned that the method of firm but gently twist in opposite directions worked the best…..and that a knife pushed inbetween the two halves did not work very well, I would suggest that you buy some “extra” just for in case you take a while to find the best way to split them open.

Split the biscuits open in advance and keep in airtight container to prevent them from going soft.

Overberg farm house visuals…

Just before serving, pipe the mousse with a piping bag onto the halved biscuits, top with a whisper ball.

It will help if someone can hold the biscuit while you pipe as it might dance around….

Serve with heaps of beautifull red strawberries and good coffee….

How pretty is this….

Thank you Liesel and Jan for inviting us to your beautifull home, Liesel, you are one of those truly creative inspirational people in my life, ….

Meringue mess at the House of Eels, Vermaaklikheid part 2 of 2

Continue from part 1 of 2 ….

So do you really want to know what the kids caught in the Eel room below the house…. while they waited for dessert? Maybe i should rather keep to the dessert…

Elzaan’s mojito’s out of a “box” with blueberries and mint…

For the Meringue Mess you will need to following:

4 packets of meringues, i like to use soft colours like cream, pink and purple.
(try to get good quality meringues or bake some yourself, they need to be goooey inside and not dried out completely)
1 tub of fresh cream
2 x 250g punnets of blueberries
1 x large punnet of strawberries
1 x flake (optional)
4 x tablespoons of sugar
some lemon juice

Visuals of the House of Eels

Make the Blueberry sauce:

Boil together one punnet blueberries, 4 tablespoons of sugar and 3/4 cup of water for +/- 8 minutes.
Strain the hot blueberry sauce through a sieve, and push as much of the blueberry pulp through the sieve with the back of a spoon. Add a BIG squirt of lemon juice and reduce further by simmering for another 10 – 15 minutes to get a rich black shiney slightly thick sauce. Let this cool completely (make in advance if possible).

Use a BIG bowl, and mix together the 4 x packets of meringues (break them up a bit), one tub of whipped cream, 1 punnet of fresh blueberries 1 punnet of halved strawberries, and the homemade blueberry sauce. It is important not to mix the ingredients too much, basically give it 2 stirs and that should be enough otherwise it might get too messy. You should still be able to see the individual ingredients …..

Serve on a BIG white flat platter as this is one of those visual feasts…. sprinkle with flake or chocolate shavings….

After dessert we all walked down to the river ….

This is such an untouched piece of paradise…

And when the sugar rush hits a HIGH, trust Bruce to take the team for a “penguin walk / dance” through the house while the “penguin song” blares over the Duivenhoks Valley….

The “penguin walk to the penguin song” don’t ask me what the song is really called , i have no clue…

Tomato Tart at the House of Eels, Vermaaklikheid Part 1 of 2

I will start this post by saying that THIS is my favourite recipe of all times (for now), and that should tell you all you need to know….

When Catherine invite you for a weekend away, you cancel all plans and you go…. mmm quite a statement, but Catherine has a way of choosing those special little gems…. Talking of gems, this weekend was in celebration of Gemma’s birthday and what better way to celebrate a birthday than with making a weekend of it.

The House of Eels… Vermaaklikheid…

House of Eels

The House of Eels on the banks of the Duiwenhoks river, 3 large bedrooms and one kiddies bunk room with 4 single beds, a very well equipped kitchen with open plan diningroom / livingroom, inside braai area and stunning outside stoep overlooking the Eel ponds below.

Our room…

Apparently the Eels used to come over the dry land from the river, into the ponds and be fed in the special “underground” room … we had endless conversations about how this actually worked….

I made this tart as our Starter for lunch on the Saturday.

For the tomato tart you will need:

1 roll of puff pastry
about 8 large leeks cut into very thin rings
cayenne pepper
3 or 4 tablespoons of cream
some mayo
one block of creamy blue cheese
small cherry tomatoes
a handfull of pine nuts
Thick reduced balsamic for serving
2 x loose bottom tart pans…

You can make the following in advance if time is a problem.

Saute the leeks in a bit of butter and olive oil until soft, stir often and don’t let them turn too brown.
Add a sprinkle of cayenne pepper (that MUST do ingredient to make or break this tart, don’t leave this out).
Stir in 3 – 4 tablespoons of cream.
The cream should just be enough to “wet” the leeks, it must not be runny, just moist and wet with cream.
Put aside till needed, it can cool down completely, but also can be used immediately if not made in advance.

For the pastry I used one roll of puff pastry cut lenghways in half, rolled out slightly.
Fit pastry into the pans, and put in fridge until needed.

Roast the pine nuts in a dry pan until they’ve slightly browned, stir continiously with a wooden spoon and remove the pine nuts from the pan as soon as they start to turn brown.

Gemma the birthday girl…

About one hour before lunch start packing the tart, you don’t want to do this earlier as the pastry will go soggy.

Spoon the leeks into the pans and even out, there should be no runny liquid on the pastry, the bottom of the pastry will still be semi visable, so not a too thick layer of leeks, see pic below.

Cover leeks with thin slices of blue cheese (i like the creamy blue one from spar in the gold and blue wrapping). And add small dollops of mayo over the blue cheese, see pic below for how much, as you don’t want the tart to become too “wet”.

Now for the fun part, cut the tomato’s into halves and pack on the blue cheese in neat rows.

Bake at 180 degrees in a pre-heated oven, make sure the pastry is properly cooked, golden and brown, rather too brown than too soft. This can take up to 35 minutes. Once baked, remove from the oven and let the tart rest in the pan for about 15 minutes to “settle”.

Remove the tarts from the tart pans, (Shannon will firmly but gently slide a big knife between the pastry and loose metal bottom of the tart pan to loosen the tart and in one swift movement push it off and onto a wooden board), ready for serving…

Drizzle with thick reduced balsamic reduction and sprinkle with the pine nuts.

We served these tarts on a rough piece of wood with a long sheet of baking paper underneath….. very visual…

Serve with a “green only” salad….

And after lunch, the kids went Eel hunting until it was time for dessert at 16:00…..

And guess what they nearly caught, right there where they’ve been playing the whole weekend…

Dessert to follow in part 2…

Everyday Chicken Curry – a family favourite..

This lovely flavourful chicken curry is a recipe from Bruce’s father, now Bruce Jnr makes it quite often when “the weather” moves in. I actually think it is this family’s favourite family recipe as we eat it quite often. It’s quite a simple recipe but it really works, Bruce had to write it down last night while making it so let’s hope the quantities are correct, as he commented “how do i measure a couple of shakes of chutney….”

For this curry you will need:

8 chicken drumsticks and 8 chicken thighs (the chicken quantity is not really important)
2 sliced onions
4 cloves of crushed garlic
2 tablespoons of hot curry powder (Bruce use Cartwright’s)
sprinkle of chilli flakes
1/2 bottle of Mrs Balls fruit chutney
a couple of shakes of Worcestershire sauce
1 x packet of ministrone soup powder
1 litre of tomato juice
Boiling water
some peas, peeled carrots and a couple of peeled baby potatoes.
200ml cream

Fry the onions and add the chicken pieces. Season with salt and pepper.

Mix together in a bowl the garlic, hot curry powder, chilli flakes, chutney, worcestershire sauce, ministrone soup powder and tomato juice, pour over the chicken.

Add the carrots and small peeled baby potatoes, NOW, quite important, add boiling water to level the sauce with your chicken, all ingredients should be covered with liquid, stir and bring to the boil on top of you stove.

Put the curry in a preheated oven at 170 degrees and cook with the lid on for 2 hours, i don’t stir the curry, just check the liquid every now and then as you don’t want it to go dry, but this should not happen.

For the Condiments we make:

Poppadoms (30 secs each in micro, i don’t like to fry them in oil)
Tomatoe salad
Cubed bananas with a dash of lemon juice
Greek or Bulgarian Yoghurt mixed with Mango Chutney – A MUST

Serve with Basmati Rice.

For the Yoghurt and Mango Chutney, mix about one cup of yoghurt and 1/4 cup of Mango Chutney, it is actually worth buying the bottle of Mango Chutney, it really lasts long and you can keep it in your fridge for ages once opened… I now don’t make this curry without this yoghurt and mango chutney condiment, last night i realised that i did not have any mango chutney left in the fridge and i drove all the way back to the village just for that…

After 2 hours, remove the curry from the oven, it’s heavy and it’s hot so be carefull, add the peas and 200 ml of cream. Stir through carefully just to mix in the cream, and cook for another 20 minutes. The chicken will be so soft that it will fall of the bone, so don’t stir it too much.

Serve with Basmati Rice and the condiments…..

And tomorrow, when you wake up with snow capped mountains, (can you believe it, snow capped mountains on the first day of spring )you have a big platefull of leftover curry for breakfast, that is why i always use 16 pieces of chicken…

Enjoy, we will be making THIS curry untill we are old….

Spinach and Feta Chicken Pie….at Somersetgift Farm Swellendam

If you are looking for a “let your hair down” and relax weekend, book a couple of days at Somersetgift Farm, Swellendam. We’ve booked Fish Eagle Lodge for a family birthday weekend (my mom turned 70, dad 77 and my Emma 7) so it was quite a BIG birthday weekend, and what better way than to celebrate it with the whole family.

I was in charge of Saturday’s lunch, and decided to make this very tasty and visually appealing chicken pie, it is a bit of a labour of love, but so worth the little bit of hassle to make it.

By 8 the house was filled with the smell of Roast chicken, and by 10 we all had some “special birthday cake” on the veranda overlooking the beautifull Swellendam mountains….

And then it was time to start playing in the kitchen..

For this Spinach and Feta Chicken Pie you will need:

1 Whole free range chicken
1 Roll of puff pastry
One bag of creamed spinach (you will find this with the frozen veggies, it comes with 2 bags in a small box, or you can make a creamy spinach mixture by frying spinach with a little bit of cream, you will need about 3/4 cup full)
One wheel of feta cheese, broken into small pieces
One cup of bechemel sauce (quite thick)
1 egg for on top of the pasty

For the sweet red tomatoes you will need:
A couple of red Rosa tomatoes
Half a cup of Red Wine vinegar
1/4 cup of brown sugar

Roast the chicken, cool and debone. Add the creamy spinach, bechemel sauce and feta. Season well and allow to cool completely to room temperature if the chicken is still slightly warm.

At this point I was running in and out of the house, taking pictures of the girls feeding apples to the horses to catching fish with ouma and oupa in the dam right in front of the house.

About an hour before you want the serve lunch start rolling out the pastry, not too thin, just slightly bigger than the standard puff pastry square.

The bottle of cold Rawbones worked well as a rolling pin with the added benefit of keeping the pastry cold.

Cut strips in the pasty, on both sides +/- 8 cm long and about 2cm wide, long enough to be able to fold over the chicken, to form a roll.

Once cut, lift the pastry onto a baking tray, and add the cooled chicken mixture to the middle of the pastry, don’t “overfill” the pastry.

Start folding the pastry over the chicken, first left then right, till the roll is formed. Don’t worry about small gaps in the pastry, no need to completely seal the chicken.

Wipe some beaten egg over the pastry to form a golden colour while baking.

Bake in a preheated oven at 180 degrees till golden in colour.

Start making the sweet little Rosa tomatoes about 15 minutes before you want the serve the chicken pie. Simmer together the Red Wine Vinegar and brown sugar till slightly thickened, this should take about 10 minutes, add a little bit more sugar if it does not want to thicken. The smell of the Red Wine Vinegar is quite addictive and yummy different….add the little red Rosa tomatoes at the end and simmer for about one minute in the thickened sauce.

Serve the chicken pie on a flat warm platter or long wooden cutting board, top with the sweet red tomatoes and drizzle with the syrupy Red Wine Vinegar reduction…

I used 2 x Roast chickens and doubled the recipe, so we served 2 chicken pies, 6 adults , 4 childen and there were no leftovers….

The savoury creamy feta infused chicken, crispy pastry, and a hint of sweet tomatoes is a match made in heaven….

And after lunch, the kids dissapeared again, down the lawn, around the dam, to feed the horses…

French onion soup – come for dinner and dress FRENCH…

When Roxy’s invite say “come for dinner and dress French”, that is what we do. Inspired by a recent trip to France and Italy, Roxy wowed us with two elegant dinner parties, Dress French and Dress Italian…

This French onion soup recipe was the starter at the “Dress French” evening.

The “french maid” greeting her guests…

For the French Onion Soup you will need:

60g butter
1 kg onions, halved and thinly sliced
4 garlic cloves, finely chopped
2 teaspoons castor sugar
300ml dry white wine
1.5 lit brown beef stock
bouquet garne (bay leaves, thyme and parsley stalks)
4 x 2.5cm thick slices of french loaf
225g grated gruyere cheese
salt and freshly ground black pepper….
(serves 5)

The French inspired menu…

To make the soup:
Heat the butter in a large heavy bottom pan. Add the onions, garlic and sugar. Simmer over a LOW heat for 30 minutes, stirring every 2 minutes until the onions are caramelized. This is a very important part to the ultimate flavour of this soup…..

A French inspired table…

Add the wine and simmer until reduced by half, add the beef stock and bouquet garni, cover and simmer for another 30 – 40 minutes. Remove the bouquet garni and season well with salt and freshly ground black pepper. Preheat the oven to 150 degrees and toast the bread on a baking tray till dried out but not browned.

Up to here can be prepared in the morning before your dinner party…

A French table….

Preheat the oven to 220 degrees. Place 1 slice of dried french loaf in the bottom of each ovenproof soup bowl, and ladle the soup onto the bread. Cover the soup thickly with the grated gruyere, place the bowls on an oven tray and bake for 30 minutes till golden and bubbly, don’t let the cheese burn… (the dried slice of french soup will float to the top of the soup and will be covered with the yummy melted gruyere.)

This flavour full rich winter soup should be served piping hot as it comes out of the oven……

Golden and bubbly French onion soup…

Roxy darling, thanks soooo much for a lovely evening, i will keep you company in your kitchen at any time…. thanks for sharing this lovely recipe with me and for “introducing me” to French Onion soup, i love it…

Bronze by Louis Chanu…. just beautifull….

Creamy Lemon Tart, at Natanya, part 2 of 2

Continues from part 1 of 2, Natanya Birthday weekend…..

After a lovely lunch, featured in part one, we’ve moved on to the outside deck, overlooking the sea….

Natanya views…

This lovely tangy creamy lemon tart was the first item we’ve put on the menu during the weeks planning our weekend, as Shannon knows, this is my favourite dessert for any “special” meal…

The base was made the afternoon before.

For the Rich short-crust pastry you will need:

250g plain flour
175g butter
1 egg

Rub the flour and the butter together, until the mixture resembles breadcrumbs.
If using a food processor, be careful not to over mix.
Beat the egg and add to the mixture. Mix till it forms a ball, and let the pastry rest for 20 minutes.

Waiting for the pastry to rest, Shannon enjoying one of several glasses of Genevieve MCC

Roll out the dough on a lightly floured cold surface. Line a greased 24cm loose bottom flan / quiche dish. Quiche dish works better as it is deeper. Let the pastry rest for another 30 minutes in the fridge, this helps that the pastry don’t shrink.

For the filling you will need:

6 extra large free range eggs (in Elgin we “free range” everything)
250ml castor sugar
120ml lemon juice
10ml finely grated lemon rind
160ml cream

Blind bake the pastry at 200 degrees centigrade for 10 – 12 minutes or until lightly brown.

Reduce the temp to 150 degrees.

Beat the eggs and sugar. You want a nice creamy mixture. An electric beater or processor makes it easier. Stir in the lemon juice and rind. Whip the cream until stiff and gently fold into the egg mixture.

Pour into the base. (bake tart on a solid baking tray… when adding the egg filling to the base leave tray and tin in the oven, pull out the shelf half way and pour in the filling, LESS MESSY)

Bake for 30 – 35 minutes until set but still slightly wobbly.

Cool, and remove from tin. (so here i’ve asked Shannon, what do i call this tin, tart pan, quiche tin, and she answered “you call it ‘tin’, and if they don’t know what that is they should not be in the kitchen….)

Dust with icing sugar once cooled completely. (You can bake this tart up to 6 hours before you want to serve it, do not refrigerate, and serve at room temerature)

Lemon tart and our new favourite “wax paper” for serving

We’ve served this Creamy Lemon Tart on sheets of wax paper, with heaps of strawberries and marscapone… AND glasses full of Genevieve MCC, a match made in heaven…

Guests…

The guests stayed till late to watch the beautifull sunset…

Natanya sunset…

Natanya sunset…

And the next morning we could not wait to sit on the “stoep”, with mugs of coffee and the last little piece of CREAMY LEMON TART…looking at the pictures….

The morning after the LUNCH before…

NATANYA, the food, the friends…………

Asian Cabbage salad at Natanya, part 1 of 2

Natanya, a beautifully restored Beachhouse, on the rocks of Betty’s Bay, South Africa. Set against the fynbos rich Kogelberg Mountains. Closer to the sea you cannot get, with whales playing in the bay, this was the spot we chose for Bruce’s birthday weekend…. Me and Shannon, it is all about the food, and this setting was going to blow our socks off.

I think we’ve spend 2 months planning “the lunch menu”, (endless hours of fun over cups of tea and glasses of wine) as this house is close to our hometown, we’ve decided to invite some friends over on the Saturday to make it an extra special Birthday celebration for Bruce, well, we obviously played our hearts out, planning the menu, who to invite to stay, who to invite to come for the lunch, all very exciting…

Natanya lounge

We’ve planned to have a long table in the “dining room” overlooking the bay, but on arrival we soon realised that our space was quite limited as the lounge area did not lend itself to a long table. I told Shannon, we stick to the plan, i want a long table and we just need to make it happen. Well with Shannon, my foodie friend, we’ve managed to find this beautifull old wooden table outside and at the end we could not have asked for a more fitting visual display…. I loved the rough wood feel of the table and we presented some of the dishes straight on the table without any serving platters, just on sheets of wax paper.

Long rustic table

The recipes for our lunch that will feature in this blog post will be Sanmari’s Asian Cabbage salad. Cabbage, yes, i am not big fan of cabbage but this salad is a real crowd pleaser and got a lot of ooos and aaaaahs from the guests. In part 2 I will post the Creamy Lemon Tart …… And play we did play, in this beautifull open plan kitchen, also with a stunning view of the bay.

For the Asian Cabbage Salad you will need:

Salad:
2 Baby cabbages, finely shredded we’ve used green and purple cabbage
1 cup spring onions cut into fine rings
1 cup mange tout

Dressing:
1/4 cup brown sugar
1/4 cup white wine vinegar
1 tbsp soya sauce
Some flavouring, 1 tsp, in the form of chicken stock powder
1/4 cup of olive oil

Topping:
200ml sunflower seeds
200ml flaked almonds
1 packed of uncooked 2 minute noodles broken into small pieces

Start by making the dressing, boil all the ingredients together for 5 minutes, until all sugar is dissolved and the dressing slightly thickens.

Then, chop / shred the cabbage finely, add the spring onions and mange tout.

Roast in an oven tray the topping ingredients, don’t take your eyes off the tray while in the oven, the nuts and raw two minute noodles needs to lightly brown, be careful as once it starts to brown it can burn within seconds, you need a light brown colour.

The above 3 steps can be done well in advance.

One hour before serving mix the dressing with the cabbage mixture.

Just before serving, give the cabbage and dressing another good mix and top with the cooled roasted nuts and noodles…

Don’t mix the nuts and noodles into the salad, it should be on top of the salad to keep it’s crunch…

We’ve served an caprese salad with the Asian Cabbage Salad, made of half red ripe tomatoes, basil pesto and slices of moserella cheese…topped with more drizzles of basil pesto… visual, visual….

The menu further included a goats cheese tart, mini aubergine and feta meatballs (served in heaps straight onto the rough table on wax paper), Asian sticky pork neck cooked for 3 hours and beetroot roasted with red onions and garlic….

Natanya was everything we wanted and expected for this lunch, how do i describe the feeling when we (me and my foodie friend) look at each other at the end of the meal, and we just know we’ve knocked their socks off…. no words needed, a passion for good food we share…

TO FOLLOW: PART 2 OF 2 , THE NATANYA DESSERT…. A SEXY CREAMY LEMON TART SERVED WITH STRAWBERRIES AND MARSCAPONE CHEESE…

“the birthday boy and my foodie friend…”

Chocolate Fudge Tart

Earlier this week Shannon forgot to pick Abby up from school, o dear, she felt so bad about forgetting her that i got a delivery the next morning on my desk at the office….

One little slice of this heavenly chocolate tart. Luckily it did not take a lot of convincing to let her make it again for me this morning.

For the Chocolate Fudge Tart you will need:

240g unsalted butter cut into small blocks at room temerature and slightly soft
360g dark chocolate, we’ve used Albany with slivers of almond (don’t use chocolate with big pieces of nuts, if you don’t find the one with almond slivers, then use plain dark chocolate)
290g light brown sugar
4 tbsp water
5 large freerange eggs
pinch of salt
50g finely chopped pecan nuts
cocao powder for dusting
Double thick cream for serving but this is really optional…

Greasing the tin…

Preheat the oven to 170 degrees..
Grease a 20cm springform cake tin, or slightly smaller tin, don’t go bigger…
Put the sugar and water in a small saucepan and dissolve the sugar and bring to a rolling boil for about 1 minute or until all the sugar is dissolved, don’t boil too long, it should not go brown.

Bring the sugar and water to a rolling boil…

Place the dark chocolate and butter in a large heatproof mixing bowl, make sure the chocolate is broken into small pieces as the warm sugary water needs to melt the chocolate and the smaller the chocolate and butter, the easier it will melt.

Chocolate and butter

By now the sugar should be reaching a rolling boil, remove from the heat and slowly pour the bubbling sugar and water mixture over the chocolate and butter pieces.

Melted sugar reaching a rolling boil..

Don’t stir, let it rest for about one or two minutes.

Melting butter and chocolate

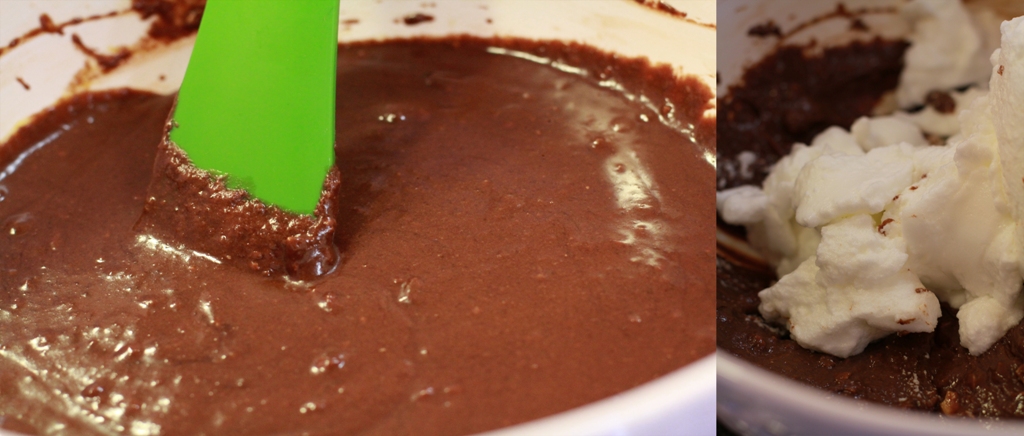
Slowly start to stir the mixture, don’t panic if it looks grainy, it should come together, just let it rest for another couple of minutes and stir again, untill the butter is completely dissolved. It is important for the butter to be at room temperature and soft otherwise it won’t melt into the chocolate.

Seperate the eggs, stir the egg yolks into the chocolate mixture and allow it to cool completely.

Adding the egg yolks…

Chop the pecan nuts fine, we prefer them fine to prevent them from dropping down to the bottom of the cake, add to the chocolate mixture.

Chopped Pecan Nuts…

Whisk the egg whites to form firm peaks, add the pinch of salt to the egg whites, slowly fold into the cooled chocolate mixture, don’t over mix.

Pour 2/3rds of the mixture into the greased loose bottom tin, remember ONLY 2/3rds of the mixture as strangely this is a double baked chocolate tart… not too sure why but it works…

Spud and the chocolate tart…

In the tin… and leave some mixture for later…

Bake in the pre heated oven for 40 minutes, remove the cake from the oven and allow to cool.

At this stage we’ve had some tea on the stoep, overlooking the beautifull Elgin Valley…. and gave Spud the attention he demanded the whole morning while we were busy in the kitchen..

Having a cup of tea, overlooking the Elgin Valley..

Spud..

As we walked back into the house, Shannon asked me {DOES THAT CAMERA OF YOURS HAVE A SMELL SENSOR? AS IT WILL FLIP THE ROOF WHEN YOU WALK BACK INTO THE HOUSE! And believe me, the smell of warm baked dark chocolate hits your sense like you cannot believe…

Once the cake is cooled, gently push down the cracked top with anything flat, gently and just slightly, then pour over the remaining uncooked chocolate mixture (the last 1/3rd). Return the cake to the oven and bake a further 30 minutes.

The “second” bake…

I find this “raw batter” being baked on the “baked tart” quite strange, but magically this really works to give it a fudgy gooey consistency at the end…

The Second bake..

Keep to the baking times of the cake , the skewer should not come out completely clean as the cake still needs to be gooey inside.

Testing the second bake..

Leave the cake to cool completely in the tin, at this stage I sadly had to go home, so Shannon packed the warm cake safely into a box for my journey home.

For the yourney home…

Once home, I’ve let the cake cool completely before I’ve turned it out.

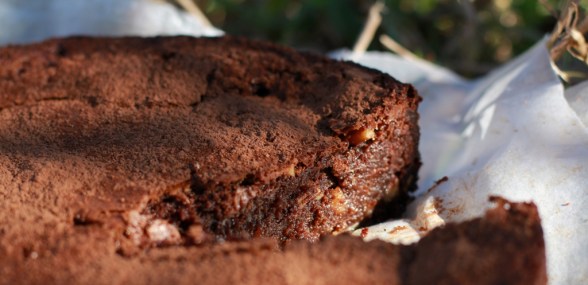
Dust with cocoa and serve as is, or with a dollop of double thick cream…

Chocolate Fudge Tart…

This tart can be made the day before, just don’t put it in the fridge, I would prefer to make it in the morning before you want to use it, as i think that nothing tastes like “freshly baked” warm chocolate…

Chocolate Fudge Tart..

Enjoy, i can just imagine that this will work well for a packed picknick as well…